STEEL-R RIDE Exemplar Courses
This page is intended to serve as a supporting document for the Exemplar Courses for RIDE, the Rapid Integration & Development Environment developed by the USC Institute for Creative Technologies (ICT) (https://ride.ict.usc.edu/).
These courses:- Set Up Your Machine for RIDE
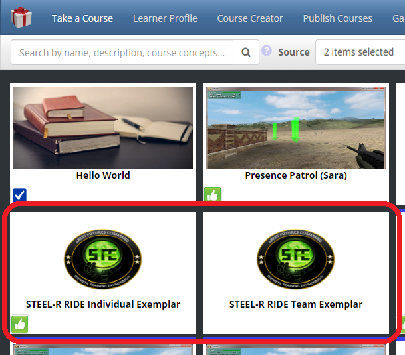
- RIDE Individual Exemplar course
- RIDE Team Exemplar Course
can be downloaded from the GIFT Downloads page.
Importing GIFT Courses
Once you log into GIFT, you can import a downloaded course with the following steps:
- Navigate to the "Take a Course" page if you are not already there, by clicking "Take a Course" in the upper navigation bar.
- In the bar below that, at the right side of the screen, left-click "Import".

- By left-clicking "Browse" and using the file interface, choose the zip file that contains your course.
- Left-click "Select File".
- GIFT will import your course, and it will appear on the list of courses that can be taken.
It is highly recommended that this page is open and accessible to the user at all times while running the course(s). The purpose of these course(s) are to exercise the use of RIDE, a readily available environment used to develop and test ongoing research across game engines. In this instance RIDE is built upon the Unity game engine.
Information on Courses
Three courses are provided for use with RIDE.
- The Set Up Your Machine for RIDE course gives instructions for initial setup.
- The instructions in this course must be completed before RIDE and GIFT can properly connect.
- The STEEL-R RIDE Individual Exemplar course showcases a number of ways in which GIFT can work with RIDE to assess the performance of learners, as well as logging the learner's actions for later playback.
- The STEEL-R RIDE Team Exemplar course showcases the ability of RIDE to allow multiple users to join the simulation together, and of GIFT to assess and log the actions of a team of users.
Set Up Your Machine for RIDE
This course should be run before either of the exemplar courses if you have not yet set up your machine for RIDE.
- This course is a step-by-step walkthrough on setting your computer up so that it can run RIDE and connect to GIFT.
- If you start that course and perform the steps as they appear, you will be able to run the STEEL-R RIDE Exemplar courses afterward.
- Much of the information from that course is also included in the Quick Start Guide on this page.
- NOTE: The Set Up Your Machine for RIDE course never connects to RIDE directly. It lists the steps necessary to do so when running other courses.
STEEL-R RIDE Individual Exemplar Course
The STEEL-R RIDE Individual Exemplar course showcases several features of GIFT while interfacing with RIDE.
You will be presented with information as text when you first run the course, instructing you on how to begin.
Once you connect to RIDE, you will also see Feedback messages in the GIFT webpage window while you run the course. These will tell you the specifics of what to do, and how you are being assessed. They represent feedback messages which GIFT can provide to learners while they interact with RIDE. Feedback will be presented while you navigate through the five stations and complete actions that cause changes in your performance state.
You will be assessed with the seven following condition classes, which activate individually when you reach the designated stations as instructed in the RIDE simulation.
- Assigned Sector
- Avoid/Reach Location
- Detect Objects
- Eliminate Hostiles
- Engage Targets
- Fire Team Rate of Fire
- Muzzle Flagging
- Observed Assessment
When the course is finished, GIFT will display a slide show with more information on each of these conditions.
STEEL-R RIDE Team Exemplar Course
The STEEL-R RIDE Team Exemplar course showcases the ability to run networked RIDE sessions and train as a team.
As with the Individual course, it contains information as text to instruct you on how to begin, and Feedback messages which give you instructions while you run the course. You will receive feedback only on the "Fire Team Rate of Fire" and "Eliminate Hostiles" conditions, but will be assessed on others as well, which can be viewed in real-time or as recorded logs using the GIFT Game Master.
Quick Start Guide
RIDE can be used by a single player or multiple players. When there are multiple players each player will have their own instance of RIDE. In either case there will always be a single RIDE instance that manages the world; this is called the Host. A Host RIDE instance can have many other RIDE instances connect to it; these are called Clients.
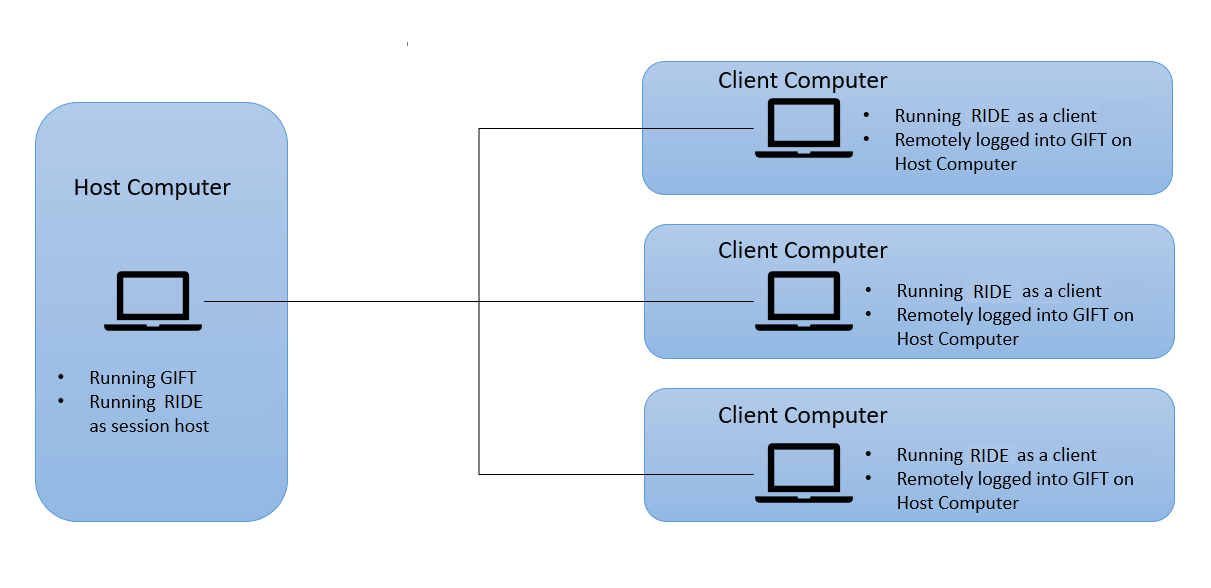
This diagram shows how a four-player setup would look with GIFT and RIDE. You can choose to run with less players. When there is only one player, only the Host exists in this diagram.
Downloading and extracting RIDE
- Download the latest version of RIDE from the GIFT Downloads page.
- Right-click the downloaded zip file, and then left-click the menu option "Extract All..."
- Type the location of the extracted folder, and left-click "Extract" to extract the files. This will move the extracted files to the location you specify, so they can be accessed later.
To enable communication between RIDE and GIFT during a GIFT Course, GIFT needs to be configured with the network IP address of the RIDE Host (e.g. 10.3.82.1). If you do not know the computer's network IP address please follow the following steps:
Determining RIDE computer network IP
Determine which computer will run RIDE as a Host. This can be any computer. You may need to open certain network ports in order for GIFT and RIDE to work properly. Refer to GIFT network ports for more information, or use the GIFT forums.
- On the Host computer, open a command prompt. This can be done by typing "Command Prompt" into the Windows search bar.
- In the command prompt, type ipconfig and press Enter.
- Information about your Windows IP Configuration will be displayed. Find the line labeled "IPv4 Address" and write that down. That is your Host IP Address.
- NOTE: Even if you are running RIDE on the same computer as GIFT, do not use an IPv4 "loopback address". This will cause issues connecting to RIDE.
- In the default configuration, your Host computer will also run GIFT. However, it is possible to run GIFT and the Host instance of RIDE on separate computers. If you are doing that, repeat steps 2-4 on the computer running GIFT to obtain that computer's IP address as well.
Configure GIFT with RIDE computer network IP address
Follow these steps to set the GIFT Gateway interop configuration value for RIDE:
- On the computer running GIFT, navigate to GIFT/config/gateway/configurations/default.interopConfig.xml and open the file in a text editor.
- Search for the tag called <RIDE>. Inside that tag will be another tag called <networkAddress>, which contain the value RIDEHostIpAddress (unless you have already set it to a different value).
- Replace RIDEHostIpAddress with the Host IP Address you wrote down in an earlier step.
- Inside the <RIDE> tag is another tag called <networkPort>.
- Ensure that the value of <networkPort> is 11000. If not, set it to 11000.
- Inside the <RIDE> tag is another tag called <grpcNetworkPort>.
- Ensure that the value of <grpcNetworkPort> is 5001. If not, set it to 5001.
- Save the change to default.interopConfig.xml.
- Close default.interopConfig.xml.
- If GIFT is running, exit GIFT before continuing to apply any configuration changes.
Configure GIFT for multiple players
Follow these steps to configure the GIFT properties when you want to run with multiple learners in the same RIDE scenario:
- On the computer running GIFT, navigate to GIFT/config/common.properties and open the file in a text editor.
- Search for the property called TutorURL
- In the TutorURL's value, replace localHost with the IP address of the computer running GIFT.
- Search the file for a property called GiftAdminServerUrl.
- In the GiftAdminServerUrl's value, replace localHost with the IP address of the computer running GIFT.
- Save the changes to common.properties.
- Close common.properties.
- If GIFT is running, exit GIFT before continuing to apply any configuration changes.
Exiting GIFT
These steps show how to gracefully shutdown GIFT:
- Right-click the GIFT icon in the Windows system tray.
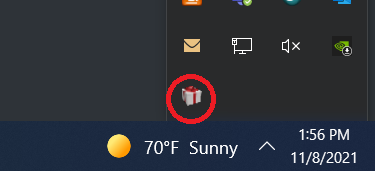
- In the pop-up menu, left-click "Exit".

- A dialog will appear asking if you want to close GIFT. Left-click "Yes".
- You may now restart GIFT and any configuration changes will be applied.
Setting up RIDE for Team Training
If you are using multiple instances of RIDE, you will need to perform some setup on each computer that is running RIDE.
Copy or download the RIDE folder to each computer which will run the software.
Each computer which is running RIDE will also need to log into GIFT.
If you are running only one instance of RIDE, and it is on the same computer that is running GIFT, then you do not need to perform these steps.
However, if any instance of RIDE is on a computer other than the one running GIFT, perform the following steps:
- On the computer that is currently running GIFT, open a Command Prompt.
- Type ipconfig and write down the address on the line labeled IPv4 Address. This is GIFT's network IP address.
- On each computer with RIDE, if GIFT is not already installed, open a web browser.
- In the web browser, navigate to the address <GIFT network IP>:8080/dashboard where <GIFT network IP> is replaced with the GIFT IP address you wrote down earlier.
- Log into GIFT from this computer
- NOTE: When logging into a GIFT computer, no two computers should use the same login. Use a different account on each computer.
You will need to perform the login steps (3-5) any time you run RIDE from another computer. Once you verify that you are using the correct IP address, you can reuse that later, as long as your IP address does not change. If it does, you will need to perform all of the above steps to determine the new IP address and use that to log in.
To host a session in RIDE
Follow these steps to host a single or multiple player scenario in RIDE:
- Double-click the RIDE executable at <RIDE Install Location>/STEELR RIDE Trainer.exe
- NOTE: <RIDE Install Location> is the location that you extracted RIDE to in the "Downloading and extracting RIDE" instructions above.
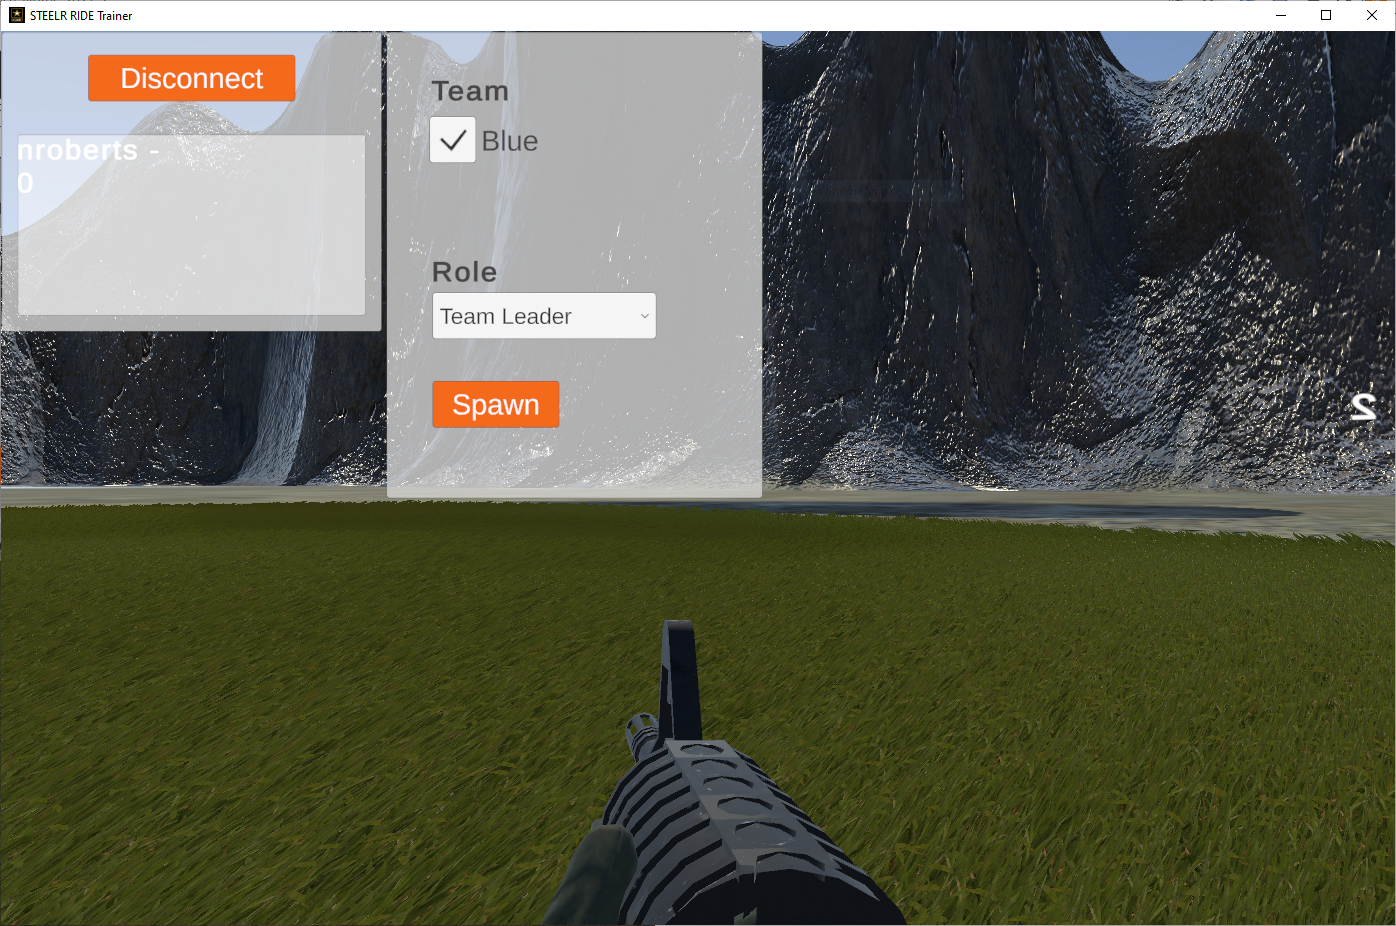
- A grassy landscape will appear, with a menu in the top left of the window.
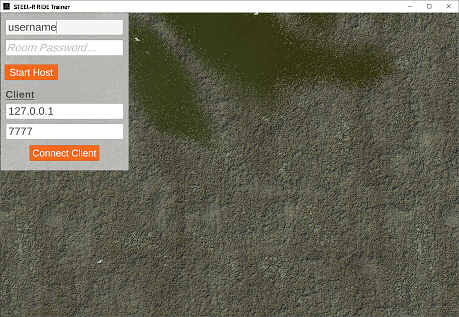
- The top text box contains a user name. If the default name is not the one you used to log into GIFT, replace that user name with your GIFT user name.
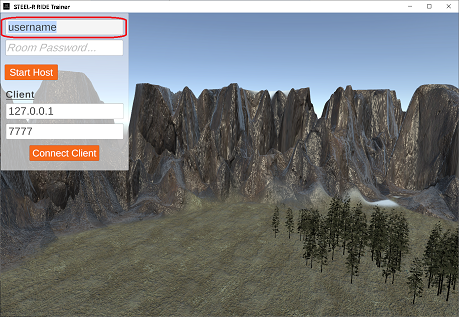
- In RIDE, click "Start Host".
- Choose a role from the "Role" drop-down.
- NOTE: Your role must match the role you are assigned in the GIFT course. In the STEEL-R RIDE Individual Exemplar course, this is always "Team Leader". In the STEEL-R RIDE Team Exemplar course, you select a role in GIFT, and it must match what you chose. If the role in STEEL-R RIDE does not match the role in GIFT, evaluations may not properly run.

- NOTE: Your role must match the role you are assigned in the GIFT course. In the STEEL-R RIDE Individual Exemplar course, this is always "Team Leader". In the STEEL-R RIDE Team Exemplar course, you select a role in GIFT, and it must match what you chose. If the role in STEEL-R RIDE does not match the role in GIFT, evaluations may not properly run.
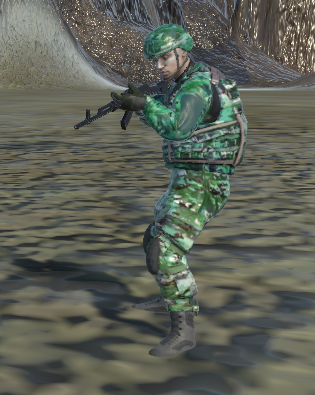
- Click "Spawn" under the "Role" drop-down to spawn an entity with that role.
- Ensure that all learners are connected and have spawned their entity before continuing.
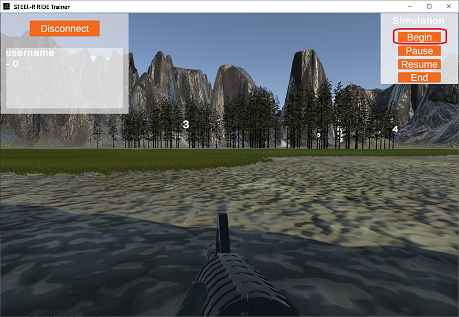
- Once the GIFT session begins, all learners are connected and have spawned entities, and you are ready to start evaluations: left-click "Begin" in the upper right menu of RIDE.
- NOTE: If a learner spawns an entity after 'Begin' is pressed, its data will not be sent to GIFT. Press 'Begin' again to fix this.
- NOTE: If a learner spawns an entity after 'Begin' is pressed, its data will not be sent to GIFT. Press 'Begin' again to fix this.
If a session is not being hosted in RIDE, you will receive an error in GIFT after attempting to start the GIFT networked session. If an error occurs, please click Disconnect in the RIDE application and retake this course.
NOTE: After each GIFT course execution with RIDE, the RIDE application needs to be disconnected with the "Disconnect" button before attempting to run a course that uses this training application again.
Instructions to connect RIDE Client to a RIDE Host
When running multiple instances of RIDE, all instances except for the host will be clients, which involve a slightly different startup process.
- The RIDE host must already be running for these steps to work. See the above instructions ("To host a session in the RIDE, follow these steps") to start a RIDE host.
- Launch the RIDE application. These instructions will refer to the window that appears as the RIDE client window.
- NOTE: If you have already launched the RIDE application to start the host, launch it again. The client runs in its own window.
- NOTE: You can run this on a separate computer from the RIDE host, as long as it is able to connect.
- In the RIDE client window, click "React to Fire (Forest)".
- In the RIDE client window, under the word "Client", change the IP address to match the IP address of the RIDE host.
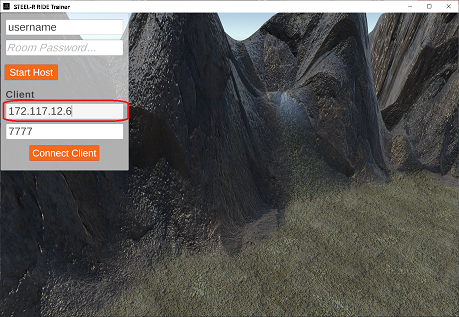
- Do not change the port number from 7777. That number is correct.
- In the RIDE client window, click "Connect Client".
- In the RIDE client window, the UI will show a "Role" drop-down and a "Spawn" button.
- Choose your role from the "Role" drop-down.
- NOTE: Your role must match the role you are assigned in the GIFT course. In the STEEL-R RIDE Team Exemplar course, you select a role in GIFT, and it must match what you chose. If the role in RIDE does not match the role in GIFT, evaluations may not properly run.
- NOTE: Your role must match the role you are assigned in the GIFT course. In the STEEL-R RIDE Team Exemplar course, you select a role in GIFT, and it must match what you chose. If the role in RIDE does not match the role in GIFT, evaluations may not properly run.
- Click "Spawn" under the "Role" drop-down to spawn an entity with that role.
- You now have control of an entity in the RIDE client window. Before running the course, though, you should wait for the RIDE host to finish its setup and for the operator of the RIDE host to click "Begin".

An image of the RIDE and GIFT course running
Using Game Master
The Game Master tab will allow you to view assessment data and a map of entities while the scenario progresses.
To access the Game Master tab while a session is actively running:
- Open the system tray in the corner of the Windows Start menu.
- Right-click the GIFT icon.
- Left-click the "Open GIFT Webpage" option. A new tab will appear with the GIFT login screen.
- Log into that tab with the same credentials you used to log into GIFT.
- Left-click "Game Master" on the GIFT page. A dropdown menu will appear.
- Left-click "Active Session" from the Game Master dropdown menu.
- A screen will appear which says that "There are no sessions currently active."
- When the RIDE course object begins, the Game Master screen will show a new session called "STEEL-R RIDE Team Exemplar". Left-click that to open and display the Game Master map.
- NOTE: You will know that the RIDE course object begins when the GIFT webpage window shows two mostly empty green panes, with the leftmost pane displaying textual feedback.
- NOTE: You will know that the RIDE course object begins when the GIFT webpage window shows two mostly empty green panes, with the leftmost pane displaying textual feedback.
The Game Master can also view playback of past sessions that are no longer running.
To view the previous session in Game Master:
- Left-click "Game Master" on the GIFT page. A dropdown menu will appear.
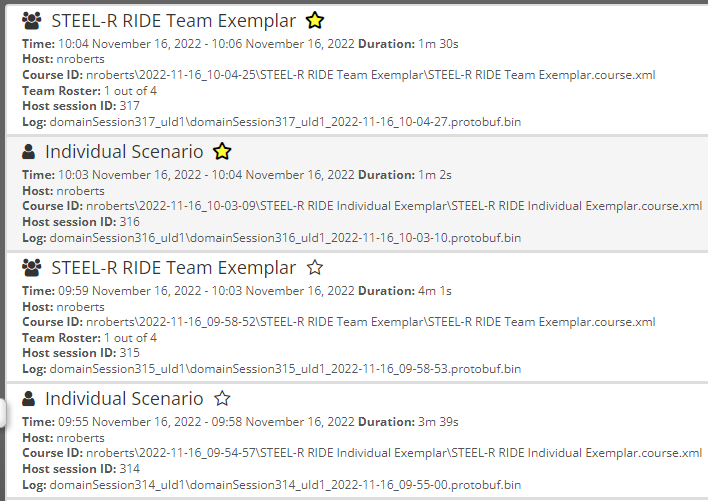
- From the dropdown menu, left-click "Past Sessions".
- Any sessions you have run in GIFT should be listed. Certain selected sessions may be marked as favorites with a highlighted star. These will be at the top of the list.
- You can click an un-highlighted star to mark its course as a favorite for later reference.
- You can click an un-highlighted star to mark its course as a favorite for later reference.
- Left-click the session that you want to play back.
- Left-click the Play button to begin playback of the recording.
RIDE
Developer Info
- The RIDE application is built upon the Call-To-Action (CTA) API codebase.
- The CTA API source code is publicly accessible, and can be viewed at the following links. This can be used to create functionality similar to the RIDE application, or to add new functionality.
- This can also be used to create new scenarios; the CTA API has the same underlying codebase as RIDE, and thus can communicate with GIFT's RIDE plugin.
- NOTE: The RIDE release is based on the CTA API's Unity version, and will require a Unity license in order to compile and use the source code.
GitHub Repo: https://github.com/areilly711/CtaApi
API Documentation: https://calltoaction-docs.s3-us-west-1.amazonaws.com/cta/_site/index.html
In-game Controls
To access these controls while running RIDE, press the Esc key.
| Keyboard Key | Result |
| WASD or arrow keys | control movement in first person mode |
| Left mouse button | shoot |
| Right mouse button | use weapon scope |
| Esc | access menu options and display controls |
| Tab | toggle HUD visibility (in HUD: weapon safety on/off, weapon up/down state, and ammo count) |
| e | toggle weapon safety on/off (change shown on UI) |
| q | toggle the weapon up/down (change shown on UI) |
| r | reload |
| c | prone |
| i | activate night vision |
| F11 | view player names |