- Overview
- Prerequisites
- First time AWS setup
- Deploying GIFT to the AWS server instance
- Restarting the Servers
Overview
This page is intended to document the steps to deploy to an Amazon Web Services (AWS) server instance.
Prerequisites
Before starting you will need to have:
- Obtain authorization from ARL to have new AWS server instances spun up for the specific research project or GIFT development branch.
- An existing AWS server instance is required to deploy to. A GIFT AWS server instance is typically defined by 3 "servers":
- 1 server with Windows Server (runs the GIFT server and IIS web proxy server)
- 1 server to run Nuxeo Server
- 1 server to run Postgres database (used by Nuxeo server). This is an Amazon RDS (Relational Database Services) PostGres database.
- An existing AWS server instance is required to deploy to. A GIFT AWS server instance is typically defined by 3 "servers":
- Additionally the SSL certificates need to be installed on the Windows server IIS web proxy.
- The domain name that will be used to access the server must be registered.
- An Amazon Web Services account that can log into:
- https://aws.amazon.com/
- The amazon instances should be owned by the AWS account.
- You will need the following software to interface with the AWS servers:
- Windows Remote Desktop which is used to connect to various Amazon servers.
- Putty (or similar software) to login to AWS linux servers.
- This guide is geared for developers and assumes you have familiarity with AWS and have the AWS instances assigned to your account.
First time AWS setup
The following steps should only need to be done the first time you are setting up your servers.
Verify that the IPs of each AWS instance are static ips
It is best to configure the IPs as static ips so that when restarting instances, the configuration files will not need to be updated upon each restart. Ensure that the ip addresses are set to static ip addresses for each of the AWS instances.
Verify the security group settings for each AMI instance.
- Each AMI instance should have the proper security groups assigned to them based on their original settings. The security groups are specified in the AWS dashboard. The security group policies will allow the proper ports/protocols to be opened to each AMI instance along with external use.
- Configure/Verify Windows AMI Inbound security group settings
Here's the configuration settings of the Windows AMI inbound rules:

- Configure/Verify Nuxeo AMI Inbound security group settings
Here's the configuration settings for the linux Nuxeo AMI inbound rules:

- Configure/Verify the RDS AMI Inbound security group settings
In the Amazon RDS dashboard, you can configure the security group settings (inbound rules) for the PostGres database. Here's a screenshot of the current configurations:

Standing up the Amazon RDB clone
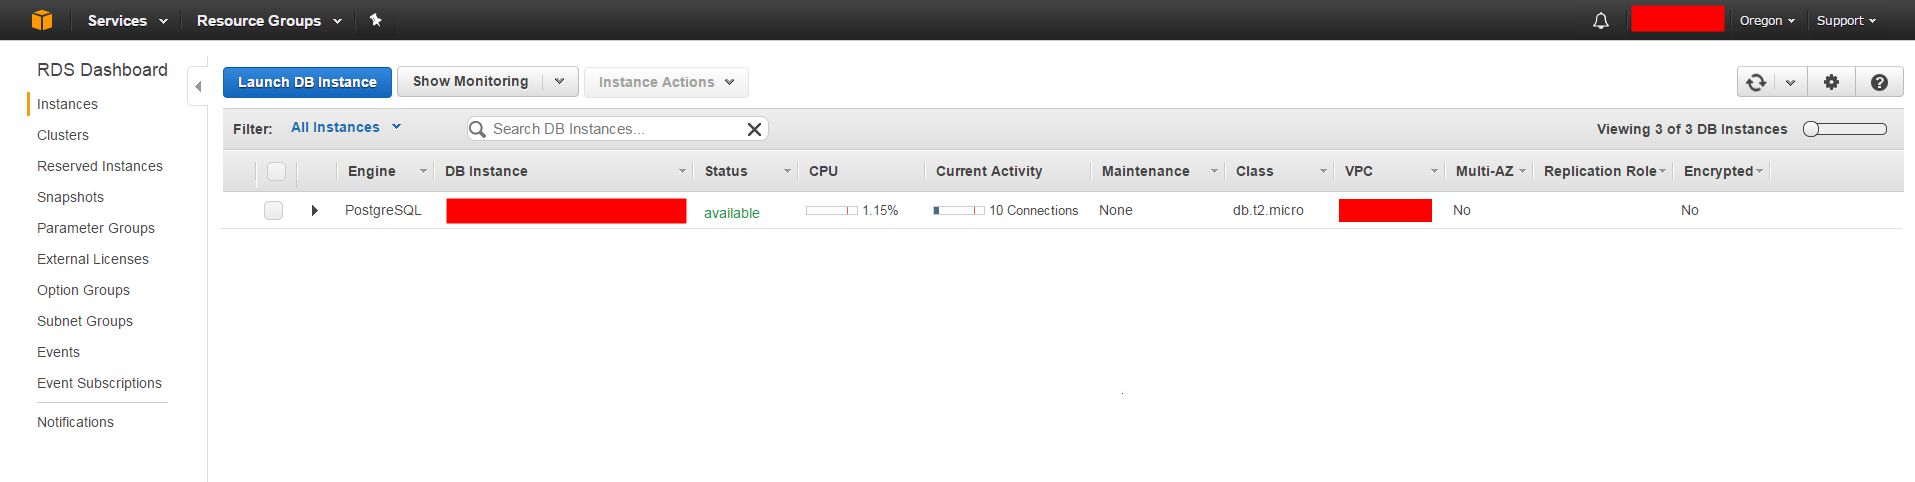
- Verify that the the RDB clone is started and has a status of available in the dashboard. You can verify that the RDB clone is running via the Amazon RDS Dashboard:
Standing up the Nuxeo clone
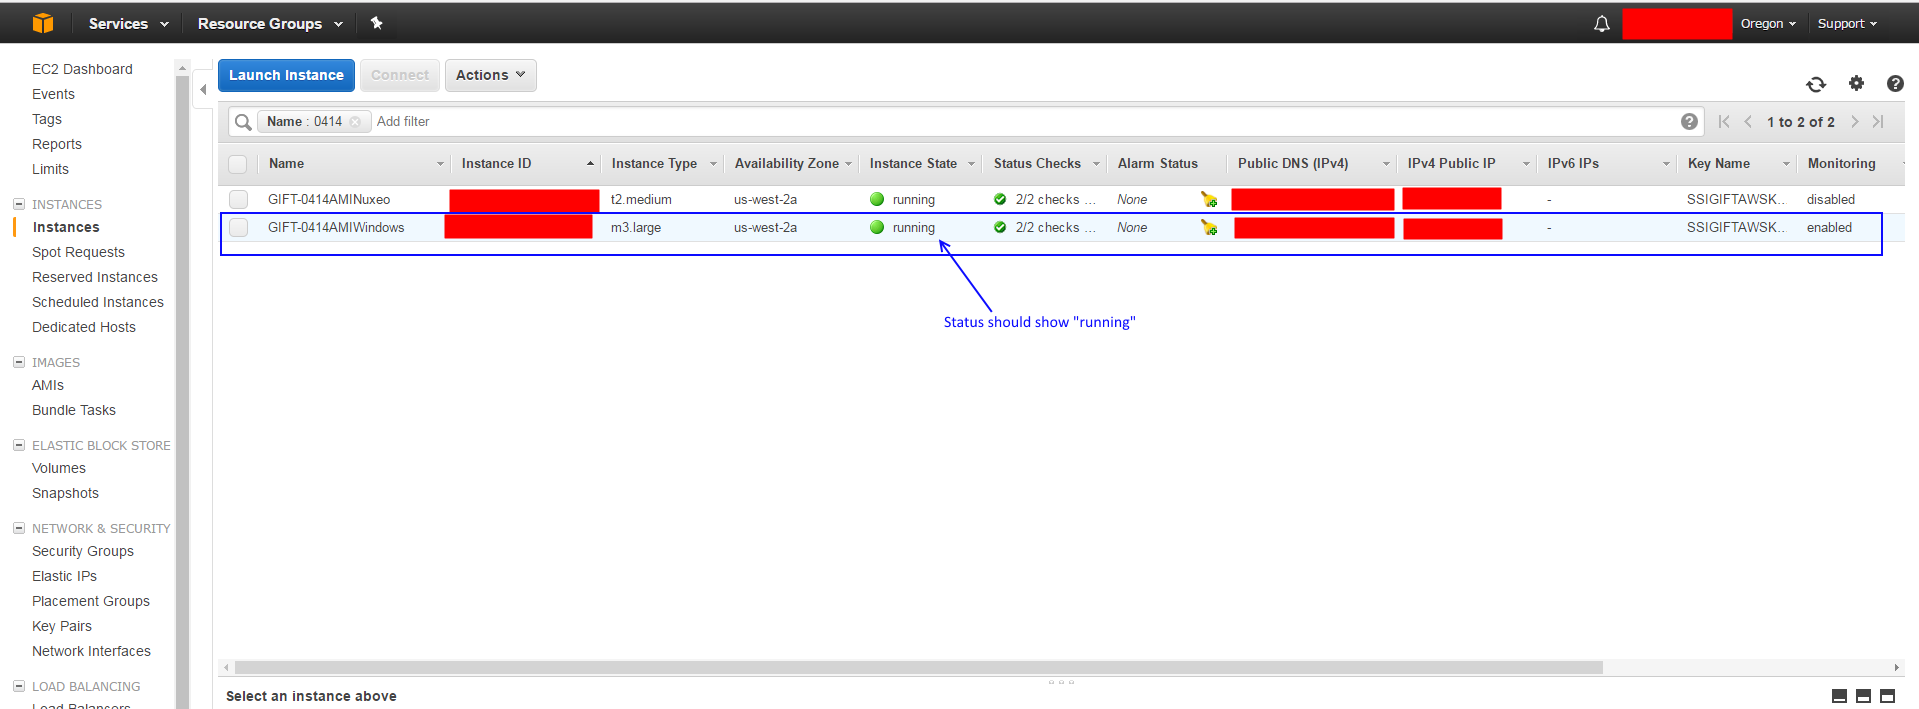
- Verify that the Nuxeo server is started and has a status of "running" in the AWS dashboard. You can view the status of the server in the Amazon EC2 Instances Dashboard:

- Use Putty (or some similar Linux terminal) to log into the Nuxeo server to configure and start Nuxeo.
- IMPORTANT There are 4 files (see below) that need to be updated to point to the proper RDS database information and proper Nuxeo configuration. Make sure all 4 are updated or Nuxeo will not work properly!
- Use a text editor (such as VIM) to change the /home/ec2-user/nuxeo/nuxeo-distribution/nuxeo-distribution-tomcat/target/nuxeo-cap-7.1-tomcat/bin/nuxeo.conf file to point to rdb clone.
[ec2-user@ip-xxxxxxxxx ~]$ sudo vi /home/ec2-user/nuxeo/nuxeo-distribution/nuxeo-distribution-tomcat/target/nuxeo-cap-7.1-tomcat/bin/nuxeo.conf

#Edit the nuxeo.db.host parameter to match the RDS host.  It should look similar to the following:
nuxeo.db.host=XXXXXXXXXXXXXXXXXXXXXXXXXXXXXXX.rds.amazonaws.com
- Use a text editor (such as VIM) to change the nuxeo configuration.properties file:
[ec2-user@ip-xxxxxxxxx ~]$ sudo vi /home/ec2-user/nuxeo/nuxeo-distribution/nuxeo-distribution-tomcat/target/nuxeo-cap-7.1-tomcat/nxserver/config/configuration.properties

#Edit the following value to match your RDS host:
nuxeo.db.host=XXXXXXXXXXX.rds.amazonaws.com
- Use a text editor (such as VIM) to change the host in the datasources-config.xml file:
[ec2-user@ip-xxxxxxxxx ~]$ sudo vi /home/ec2-user/nuxeo/nuxeo-distribution/nuxeo-distribution-tomcat/target/nuxeo-cap-7.1-tomcat/nxserver/config/datasources-config.xml

#Edit the following value to match your RDS host, port and database name:
url="jdbc:postgresql://<dbhost>:<dbport>/<db databasename>" validationQuery=""
- Configure the nuxeo secret key. This is used as a security parameter to help prevent unauthorized use to your Nuxeo instance.
- Create your own Nuxeo secret key/token. This can be a random UUID or some PassPhrase token you specify. This token will later be used in the GIFT server, so keep the secret value handy since it must match the GIFT aws.properties file later on.
- Add the nuxeo secret key to the file as follows:
[ec2-user@ip-xxxxxxxxx ~]$ sudo vi /home/ec2-user/nuxeo/nuxeo-distribution/nuxeo-distribution-tomcat/target/nuxeo-cap-7.1-tomcat/nxserver/config/authenticationChain-config.xml

#Edit the following value with your secret token
<parameter name="secret">XXXXXXXXXXXXXXXXXXXXXXXXXXXXXX</parameter>
- Save the changes to the file and keep the secret key handy for later when configuring the GIFT aws.properties file.
- Start the nuxeo service.
[xxxxxxxxxxxxxxxxxxxx ~]$ cd /home/ec2-user/nuxeo/nuxeo-distribution/nuxeo-distribution-tomcat/target/nuxeo-cap-7.1-tomcat/bin/
[xxxxxxxxxxxxxxxxxxxx bin]$ sudo ./nuxeoctl start
- Note if you ever need to stop the Nuxeo service, simply run the command: ("sudo ./bin/nuxeoctl stop")
- Leave the Nuxeo service running.
- Verify that you can login to the Nuxeo website.
- The nuxeo website will be started at: http://nuxeoserver_ip:8080/nuxeo/
- Use the default credentials to sign in:
User: Administrator
Pass: G1ftN4x304WS1nst4nc3
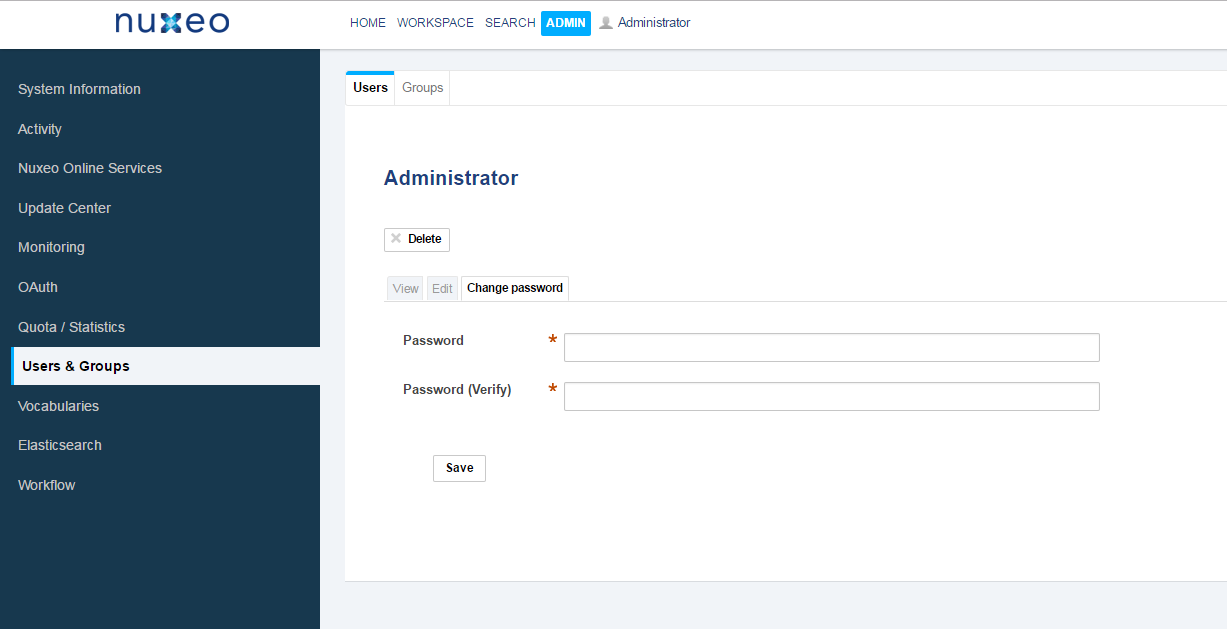
- Change the Nuxeo Administrator password
- Once you sign in as the Administrator, you can go to the Admin tab to change the password from the default. Select For security purposes, it is recommended that you change your default password so that others cannot sign in. Make sure to remember it.
Standing up the GIFT Windows VM
- Verify that the GIFT Windows AMI server is "running". This can be found in the AWS EC2 Instances Dashboard:
- Use Windows Remote Desktop Connection from your local PC to Remote Desktop into the GIFT Windows AMI server. The login credentials will depend on your AMI instances that you received but will look like the following:
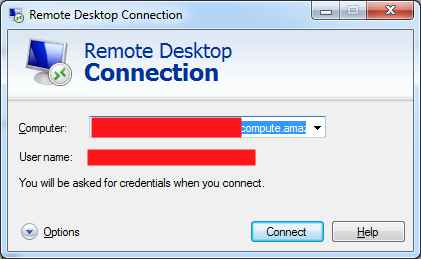
- Use the following default Administrator credentials (your host name will be different) when using Remote Desktop to your Windows AMI instance:
  Host name:   ec2-XXX-XXX-XXX-XXX.us-west-2.compute.amazonaws.com
  Username:  ec2-XXX-XXX-XXX-XXX.us-west-2.compute.amazonaws.com/Administrator
  Password:  S#u!evEC2aZe
- Change the Default Administrator password
IMPORTANT
Once you login with the default Administrator password, you should change it. This can be done in Remote Desktop by going to a command line window and typing the following (use double quotes around the password):
net user Administrator "new_password"
Once the password is changed, make sure to remember it.
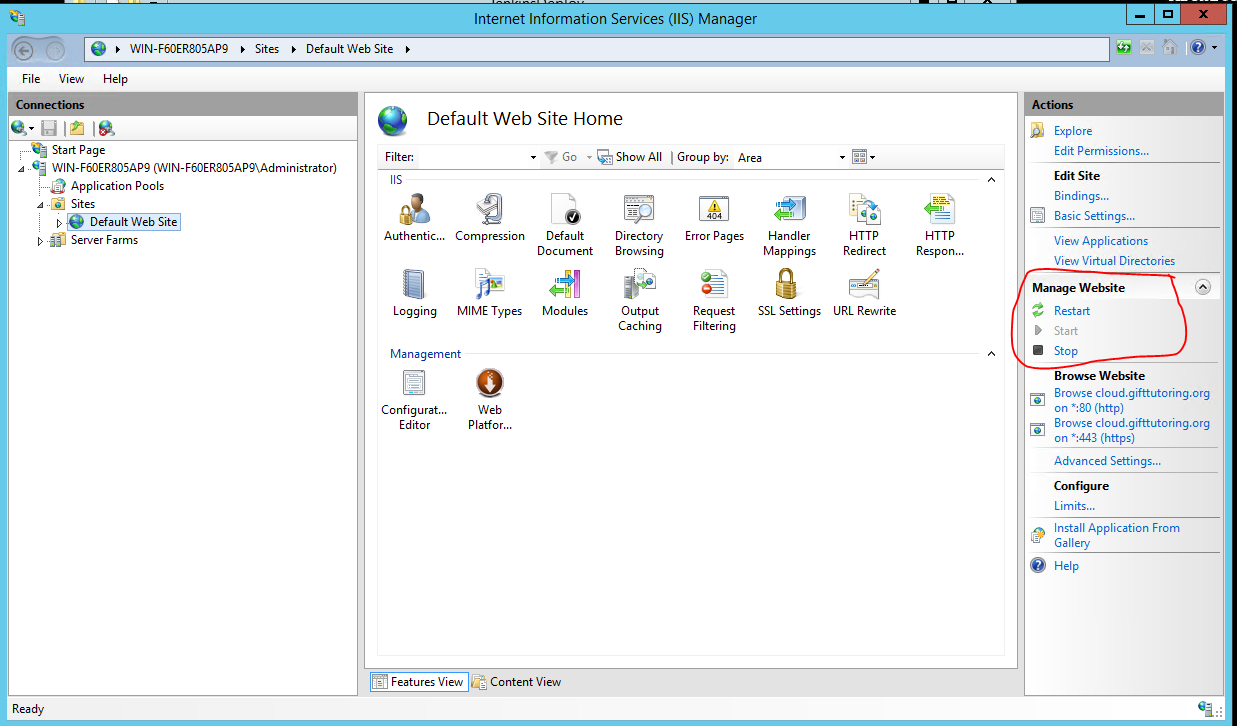
Start IIS Manage Website
Make sure that IIS is managing the website. This will allow URL rewrites and other logic to be applied to your gift instance.
Press the start button in the area circled in the following image if not already running.
Install the SSL certificate
- After signing into the Windows AMI instance, you will need to configure the SSL certificate on the machine.
- Add the binding of the SSL certificate to IIS on the AMI machine.
IIS URL Rewrites
Modify the URL rewrites in IIS to use your domain name that GIFT is hosted on. The default values "*changeme.toyourdomain.com*" should be modified match your domain name instead:
| Name | Input | Match | Pattern | Action | Action URL | Stop Processing | Entry Type |
|---|---|---|---|---|---|---|---|
| Redirect to http | URL path after '/' | Matches | * | Redirect | https://{HTTP_HOST}{REQUEST_URI} | True | Local |
| VHTat8088 | URL path after '/' | Matches | tutor/vhuman/.* | Rewrite | http://localhost:8088/{R:0} | True | Local |
| to8090Ws | URL path after '/' | Matches | ^tutor/tuiws.*$ | Rewrite | http://localhost:8090/{R:0} | True | Local |
| to8090 | URL path after '/' | Matches | ^tutor.* | Rewrite | http://localhost:8090/{R:0} | True | Local |
| toLTIConsumer | URL path after '/' | Matches | ^lticonsumer.* | Rewrite | http://changeme.toyourdomain.com:8885/{R:0} | True | Local |
| toJWS | URL path after '/' | Matches | ^jws.* | Rewrite | http://changeme.toyourdomain.com:8885/{R:0} | True | Local |
| toDomainContentHost_Runtime | URL path after '/' | Matches | ^runtime.* | Rewrite | http://changeme.toyourdomain.com:8885/{R:0} | True | Local |
| ToDomainContentHostExport | URL path after '/' | Matches | ^exports/.* | Rewrite | http://changeme.toyourdomain.com:8885/{R:0} | True | Local |
| ToDomainContentHost_Temp | URL path after '/' | Matches | ^temp/.* | Rewrite | http://changeme.toyourdomain.com:8885/{R:0} | True | Local |
| ToDomainContentHost_Experiments | URL path after '/' | Matches | ^Experiments/.* | Rewrite | http://changeme.toyourdomain.com:8885/{R:0} | True | Local |
| toDomainContentHost_resourcesContentLoading | URL path after '/' | Matches | ^resources/contentLoadingPage.* | Rewrite | http://changeme.toyourdomain.com:8885/{R:0} | True | Local |
| to8080Dashboard | URL path after '/' | Matches | ^$ | Rewrite | http://localhost:8080/dashboard | True | Local |
| to8080 | URL path after '/' | Matches | .* | Rewrite | http://localhost:8080/{R:0} | True | Local |
Add Server Error Pages
Since error pages may need to be displayed when the GIFT app is down, these server pages need to be served up by the IIS. Follow these instructions to add the server error pages to IIS.
- Copy the "ThirdParty\GiftServerTools\server error pages" contents in the SVN Repo to the wwwroot folder on the server (ie. C:\inetpub\wwwroot)
- Open Internet Information Services (IIS) Manager from the start menu.
- In the tree view to the left, navigate to <HOST_NAME>\Sites\Default Web Site\images
- If this subfolder does not exist, check that the contents of "server error pages" folder is in the right folder (ie. C:\inetpub\wwwroot) and refresh the "Default Web Site" (using the right click menu)
- In the middle pane, double click URL Rewrite.
- With the images folder selected, use the 'Add Rule(s)...' option in the right pane to add each rule displayed below
| Name | Input | Match | Pattern | Action | Action URL | Stop Processing | Entry Type |
|---|---|---|---|---|---|---|---|
| Redirect to https | URL path after '/' | Matches | * | Redirect | https://{HTTP_HOST}{REQUEST_URI} | True | Local |
- Logical grouping choose 'Match Any'
- Click Add button and populated the following:
- 'Condition input' type {HTTPS}
- Choose Matches the Pattern
- 'Pattern' type off
- click ok button
- Important If other URL rewrite rules have been inherited from the parent 'Default Web Site', delete them by first left click then delete keyboard button.
Now we need to route the 502 error to the error page we just added.
- Open Internet Information Services (IIS) Manager from the start menu.
- In the tree view to the left, navigate to <HOST_NAME>\Sites\Default Web Site
- In the middle pane, double click Error Pages
- Double click on the 502 error page and edit it with the following information:
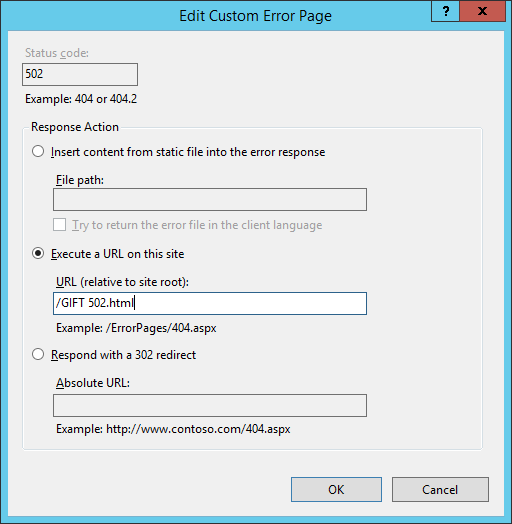
- Click OK.
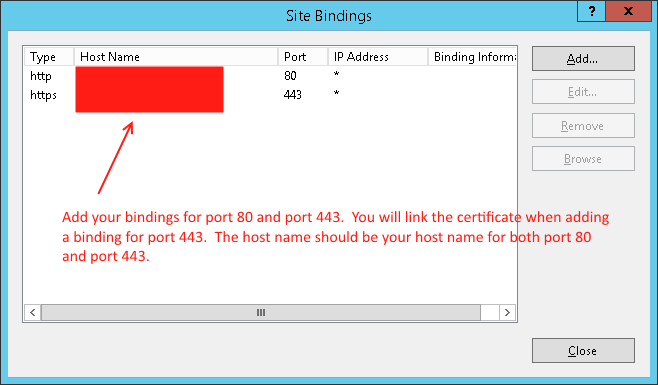
IIS bindings for port 80 and port 443
- Click the "Bindings..." on the right hand side when selecting the Sites folder.
- Add a binding for port 80 and port 443 using your hostname.
- When adding a binding for port 443, you will select the SSL certificate that was generated for your site.
- The bindings will look like the following:

Enabling WebSocket Protocol
In order for GIFT to function as intended. The WebSocket protocol needs to be enabled within GIFT. The following instructions were taken from this guide from Microsoft.
- Open Server Manager.
- Under the Manage menu, click Add Roles and Features.
- Select Role-based or Feature-based Installation, and then click Next.
- Select the appropriate server, (your local server is selected by default), and then click Next.
- Expand Web Server (IIS) in the Roles tree, then expand Web Server, and then expand Application Development.
- Select WebSocket Protocol, and then click Next.
- If no additional features are needed, click Next.
- Click Install.
- When the installation completes, click Close to exit the wizard.
- Verify URL Rewrite Rules have been created for the tutor web socket.
Install Virtual Human Character server
As of October 2018, Virtual Human is the default character for GIFT (it was Media Semantics).
- Install .NET Framework 3.5 from Microsoft (if not already installed)
- Open 'Server Manager'
- Click 'Add roles and features' on Dashboard panel
- Click Next multiple times until you reach the "Features" page.
- Check ".NET Framework 3.5 Features"
- Click Next and finally Install button.
- I had to restart the VM
- Make sure you have the VH IIS URL rewrite rule (see https://gifttutoring.org/projects/gift/wiki/Deploying_to_AWS#IIS-URL-Rewrites)
- Extract VHT Basic Web Server zip (available on Downloads page). We recommend placing Virtual Human in a short named path.
- Start VHT web server by double clicking on vhtBasicWebserver.bat. You should see several dialogs appear, some of which are minimized.
- Run a course that uses a character such as the Simple Unity example course to test that the virtual human character speaks. Keep in mind that Virtual Human is not support in IE 11 (and earlier).
Install the GIFT database
- Before starting the GIFT server, the database will need to be installed to the GIFT Windows server that you will be using from your branch.
- This is done by taking the GIFT UMS & LMS databases from your branch and copying them (via a shared folder) to the server.
- The AMI instance has a shared drive that is called "C:\GIFT\GiftBuilds". This is the folder typically where new gift server builds are deployed to.
- Sign into the Shared Folder of the Windows AMI. In a Windows browser window type "\\ec2-XXX-XXX-XXX-XXX.us-west-2.compute.amazonaws.com\GiftBuilds"
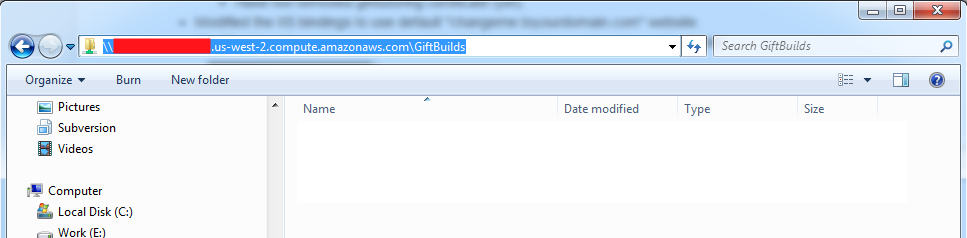
- Sign in using the same credentials as you use for remote desktop to access the shared drive.
- Copy the "GIFT/data/derbyDb/GiftLms" and "GIFT/derbyDb/GiftUms" database folders into the shared drive: "\\ec2-XXX-XXX-XXX-XXX.us-west-2.compute.amazonaws.com\GiftBuilds".
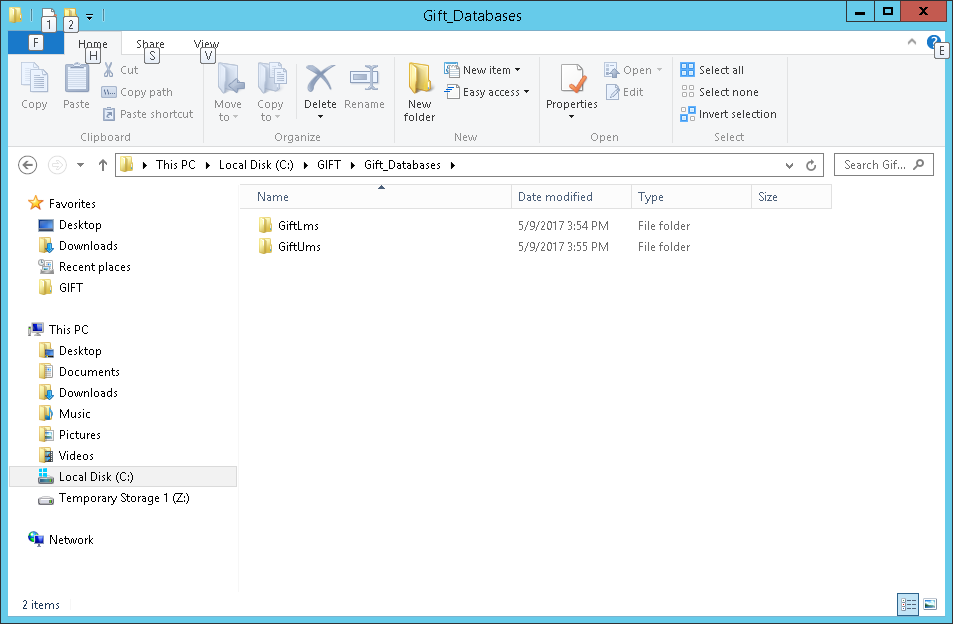
- Using Remote Desktop, access the Windows AMI server and navigate to the C:\GIFT\GiftBuilds folder, and move the "C:\GIFT\GiftBuilds\GiftLms" and "C:\GIFT\GiftBuilds\GiftUms" folders into their final location "C:\Gift_Databases"
- When all is done, you should have the GIFT Database folders that you will be using on the Windows AMI server located in C:\Gift_Databases". The folder should look like:
Once the databases are installed, the next step is to get a copy of GIFT from your branch deployed and started on the server (see next steps).
Deploying GIFT to the AWS server instance
After the initial setup is done, the next typical process is that new versions of GIFT will need to be deployed and started on the AWS instance. The following steps show how to deploy GIFT to your AWS instance.
Setting up your GIFT branch for deployment.
The current GIFT process for deploying to AWS is not yet committed to the GIFT release, but can be merged into your branch if needed:
These files can be integrated from GIFT/branches/awsDeploy/GIFT (if you do not have them in your branch):- GIFT/build.xml - Ensure you have a build-aws ANT target defined. This build.xml file changes can be integrated from GIFT/branches/awsDeploy/GIFT/build.xml.
- GIFT/build-aws.bat - Runs the build-aws ANT target.
- GIFT/aws.properties - Configuration settings file that you will modify based on your AWS settings.
- GIFT/deployTemplates - Template files that are modified by the ant target to set specific settings. NOTE if you have made customizations to any of the files in your branch that are also in GIFT/deployTemplates, you may need to merge the changes into GIFT/deployTemplates.
Setup the aws.properties file.
The GIFT/aws.properties file contains the parameters you need to use to build a GIFT deploy package for the AWS GIFT server. The parameters are explained in the file, but here's a few of the critical parameters to set:
- Change the awsDeployName to match the name of your GIFT branch.
- Change the giftHost parameter to match the domain name that you setup for the IIS server (the domain name that users will access your GIFT instance).
- Change the giftCmsUrl parameter to match the Nuxeo server url.
- Change the giftCmsSecretKey to match the Nuxeo secret key that was used in the above step.
- Add a custom window title by setting the giftDashboardWindowTitle parameter.
- Add a custom landing page message by setting the giftLandingPageMessage parameter.
- If using LTI, ensure that you modify the giftEdXConsumerKey and giftEdXConsumerSecret to use your own custom UUIDs.
# Specifies the output folder where the deploy package *.zip file will be located.  Can be a relative or explicit path.
awsDeployFolder=./deployOutputFolder
# Specify your custom deploy folder name.  The deploy package *.zip file will have the format <deployName>_<timestamp>.zip.  Typically this name is the name of the branch folder.
awsDeployName=awsDeploy
# Specifies the aws templates directory.  Certain files in the templates folder are filled in at build time by the values specified in this .properties file.  Other folders/files are simply used to override the files in the GIFT folder.
awsTemplatesDir=./deployTemplates
# Specifies the deploy mode when running GIFT.  For AWS deploys, this should always be set to "Server".
giftDeployMode=Server
# Specifies if gift server will be accessed in secure mode (SSL), which means use of https:// protocol.  Set to false to use non-secure access at your own risk.  Non-secure mode is NOT recommended for production use.
giftUseHttps=true
# Specifies if a proxy server is enabled which means gift will not need to specify ports in certain urls.  Typically this should be "true" if a proxy server (such as IIS) is involved in proxying requests to the GIFT server on AWS.
# Typically this is set to "false" if there is no proxy server (which means the user is in 'nonsecure' mode and ports need to be specified for certain urls.
giftUsePortForwarding=true
# Add a custom token/ciphor here which used to encrypt sensitive data from the GIFT server on the web client.
giftCiphorPassword=ChangeMeToYourCustomPassword
# The url to the deployed GIFT server instance.  Add your custom url to your GIFT server here.
giftHost=changeme.togifthost.com
# The url to the deployed nuxeo server instance.  Add your custom url to your nuxeo instance here.
giftCmsUrl=http://changeme.tonuxeohost.com:8080/nuxeo/
# The secret key that your custom Nuxeo instance is configured to use.  Add a custom guid here, but this guid must match the nuxeo.conf file configuration on the Nuxeo server.
giftCmsSecretKey=changeMeToACustomGUID
# The disk quota (in bytes) allowed for users in Nuxeo (controls how much space users have in their Nuxeo workspace).
giftCmsUserWorkspaceQuota=104857600
# The Administrator username for the cms (nuxeo) server.
giftCmsAdminUser=Administrator
# The port for the gift tutor web server.
giftTutorPort=8090
# The port of the GIFT Admin Server (GAS).
giftAdminServerPort=8080
# The port where active mq is deployed on the server.
giftActivemqPort=1001
# The custom edX consumer key (use a custom guid).  This is for the Learning Tools Interoperability (LTI).  Add a custom guid here.
giftEdXConsumerKey=changeMeToACustomGUID
# The custom edX consumer secret (use a custom guid).  This is for the Learning Tools Interoperability (LTI).  Add a custom guid here.
giftEdXConsumerSecret=changeMeToACustomGUID
# Specify a custom window title for the deploy.
giftDashboardWindowTitle=Add Your Title Here
# Specify a custom landing page message on the login screen.
giftLandingPageMessage=Add Your Custom Message Here (this shows up in the login screen)
# Controls whether to use the gift cloud login page (should be true for aws deploys)
giftUseCloudLoginPage=true
# Timeout value (in seconds) for when the gift dashboard will timeout if the course hasn't been started in the tutor.
giftTutorCourseStartTimeout=60
# The name of the root level GIFT folder (should not need to be changed).
awsDeployGiftFoldername=GIFT
Build the deploy package (*.zip file)
- Once your aws.properties file is configured, simply navigate to your GIFT root folder for your branch. Run the build-aws.bat file.
- This should start a process where GIFT is built in 'release'.
- At the end of the process, the GIFT/deployOutputFolder will contain a *.zip file which is the GIFT deploy package.
Copy the deploy package to AWS server instance
- Using the file share directory that you used in the above steps, copy the *.zip file into your shared "GiftBuilds" folder via "\\ec2-XXX-XXX-XXX-XXX.us-west-2.compute.amazonaws.com\GiftBuilds"
- Remote desktop to the Windows AMI server to verify that you can see the *.zip file in the "C:\GIFT\GiftBuilds" folder on the server.
Start the GIFT server
- Remote desktop to the Windows AMI server.
- To start GIFT, make sure all GIFT processes are stopped/shutdown. Also stop any *.java processes that may be running (if GIFT was shutdown).
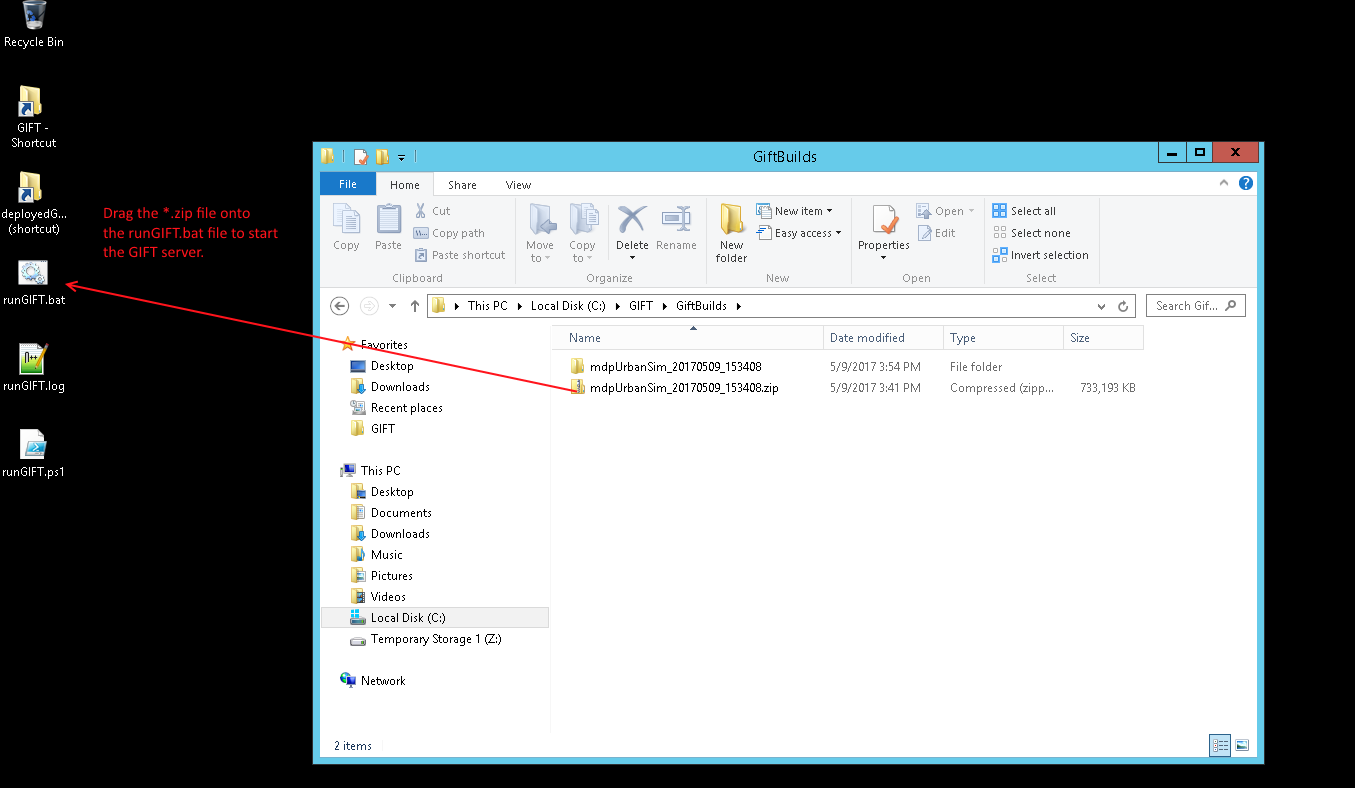
- Open the C:\GIFT\GiftBuilds folder.
- To start the GIFT server:
- Drag the *.zip file to the desktop "runGift.bat" file and drop the *.zip file onto the "runGift.bat" file:
- If the "runGIFT.bat" file does not exist, it can be copied to the desktop from SVN ThirdParty\GiftServerTools\prod\giftserver\automated_deploy or ThirdParty\GiftServerTools\dev\giftserver\automated_deploy for dev
- Drag the *.zip file to the desktop "runGift.bat" file and drop the *.zip file onto the "runGift.bat" file:
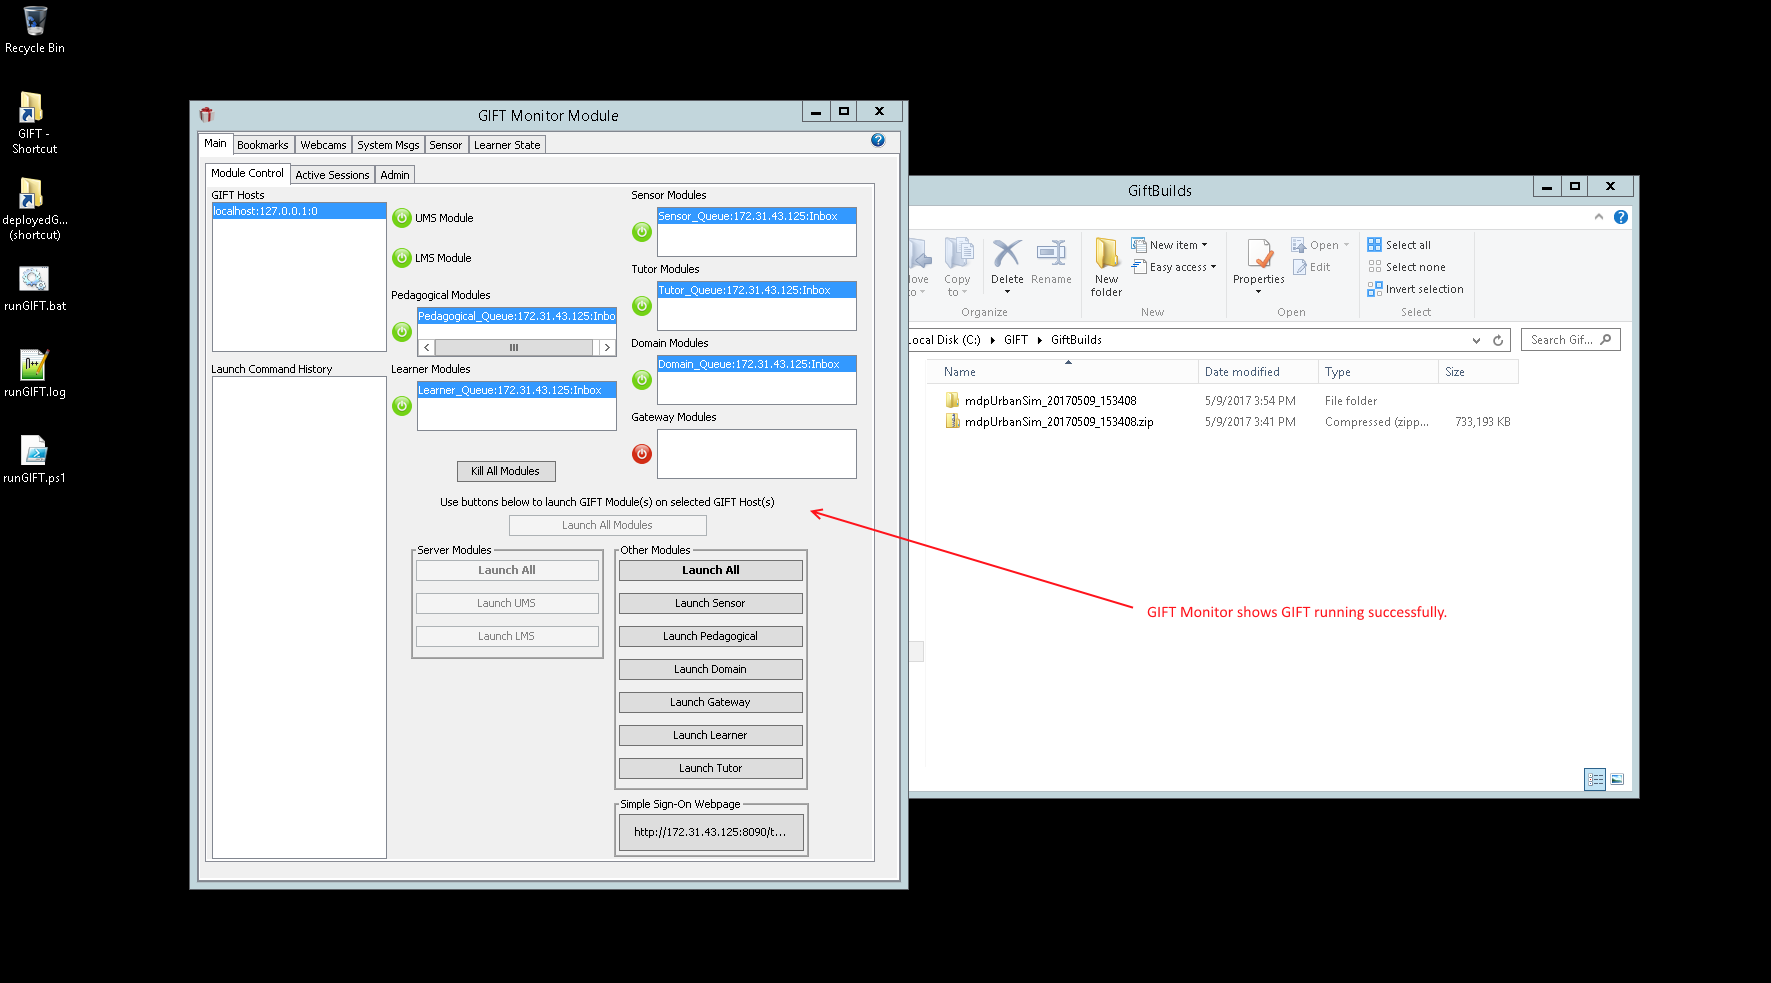
- The GIFT server should launch, and you should see the GIFT Monitor showing all modules (except for the Gateway module) as being started. This means GIFT is started and running:
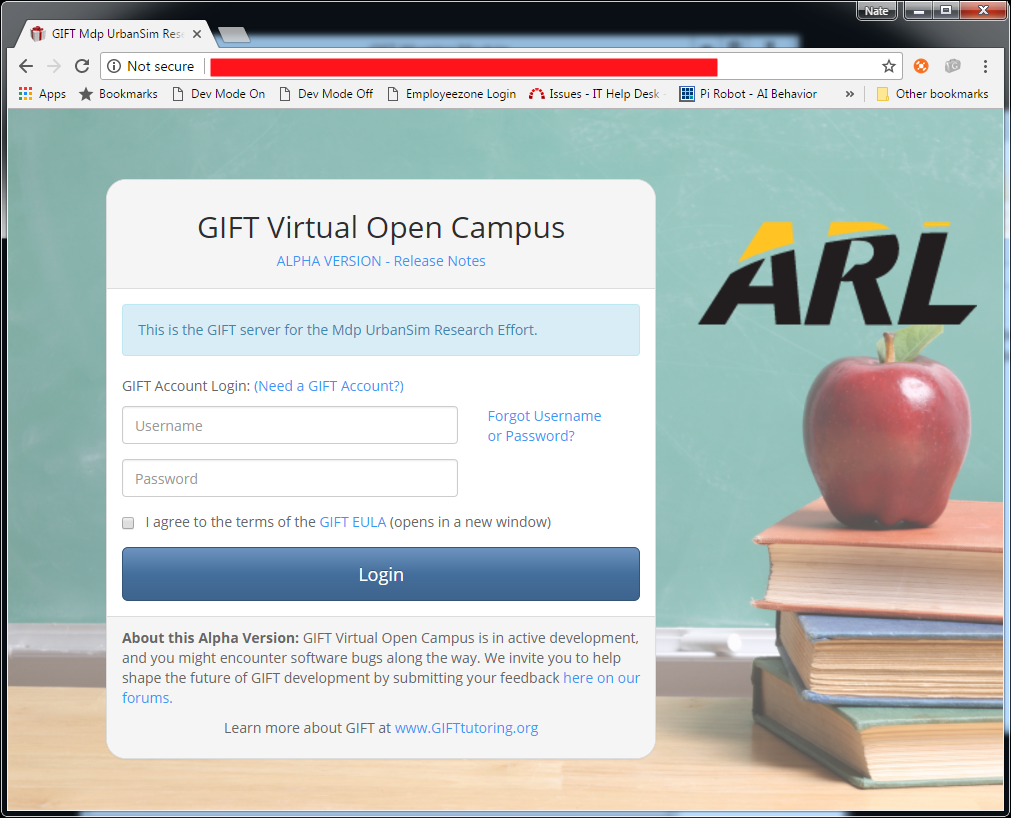
- Ensure you can access and login to GIFT by accessing it at: "https://yourdomain". The login screen should look like this:
From here you should be able to build and redeploy new GIFT instances if needed using the following steps above.
Restarting the Servers
Server Startup Order
If the servers need to be restarted, the startup order for each service should be as follows:
- Start the Amazon PostGres RDS instance (make sure that is running first).
- Start the Nuxeo Server (on the Nuxeo AMI).
- Verify you can login to the Nuxeo webpage using the Administrator account (see above).
- Start the IIS server on the Windows AMI (see above).
- Verify the status of the site is 'started' in IIS.
- Start the GIFT server on the Windows AMI
- Start the runGIFT.bat file to startup the GIFT server. (see above)
- Note that you can just double-click the runGIFT.bat file to start the server with the last build that was used.
- Verify that the GIFT Monitor shows the server running properly. (see above)
- Start the runGIFT.bat file to startup the GIFT server. (see above)