XML Authoring Tools
Overview
This document instructs how to use the various XML authoring tools:- DKF Authoring Tool (DAT)
- Sensor Configuration Authoring Tool (SCAT)
- Learner Configuration Authoring Tool (LCAT)
- Course Authoring Tool (CAT)
- Metadata Authoring Tool (MAT)
- Pedagogy Configuration Authoring Tool (PCAT)
Each of these tools uses the same user interface to facilitate the authoring of their respective XML files and therefore the “how to use the tool” instructions are the same.
Where to Start…
Follow the instructions within the “Run Instructions” document to bring up the appropriate tool.
Configuration
Each tool has a configuration file that is read when the tool is started. GIFT/config/tools/authoring/<toolname>/<toolname>.properties
Schema
You can specify a different schema file (.xsd) to use for validating the XML file structure and content. You can reload the schema referenced by the property by selecting File, then Re-Load Schema in the tool.
Note: if the schema is changed, please clean and build GIFT to generate update java files that correlate to the schema. The schema is used by jaxb to generate java classes for use by GIFT.
For more information about JAXB:
http://www.oracle.com/technetwork/articles/javase/index-140168.html
There are also a binding files (named binding.xml) used to customize the generated classes.
User Interface
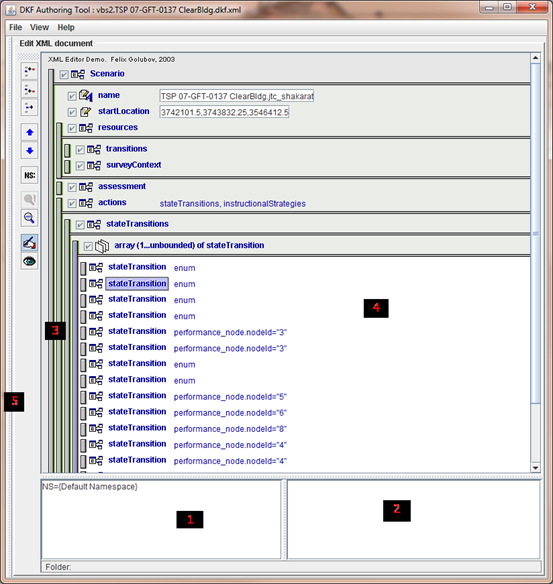
Figure 1. Screenshot of the DKF Authoring Tool (DAT) with labels on important components common to all of the XML Authoring tools.
- The information pane is where useful messages describing progress or status will be displayed.
- The error pane is where critical error messages will be displayed.
- The “expansion-bar” for tree nodes that are also parents. More information can be found in Expand/Collapse Tree section.
- A list of nodes where each node can be re-ordered, a new node added to or removed from the list. More information can be found in the Insert/Remove node in a list section.
- The split view pane separator bar that can be used to change the size of the split panes on either side of it. More information can be found in the Views section.
Create New
To create a new XML file, select “File”, then “New”. The tree view portion of the window will now contain the minimum required nodes as specified by the xsd.
Load
To load an existing XML file, select “File”, then “Load”. Depending on the type of file being loaded, the file browse dialog will place you in a predetermined directory to start your search. For example, the DAT file browse dialog will start you in the Domain folder where DKFs are usually located.
Save
To save the XML content (validated or not), select “File”, then “Save” or “Save As”.
Note: Even though the XML content is save doesn’t mean it is validated against the schema or GIFT logic.
Validate/Validate All
There are several types of content validation that occur in the tools. The schema specifies the rules for each element/attribute text value including type enumeration, minimum and maximum length and regular expression pattern, etc. If a node is determined to be invalid, the color of the label will turn to red and propagate “invalid” status to their parents all the way up to the tree root.
In addition to schema validation, each tool offers specific GIFT validation on the XML content. To GIFT validate select “File”, then “Validate”. For example, the DAT will validate the dkf content by loading it into domain module classes. If an error is thrown during the parsing and building process, it will be displayed on the error pane of the tool. Using the GIFT validating logic of the tool will help prevent issues when loading the authored content into GIFT when launching modules.
The validate all option will find all files of a particular type based on the authoring tool being used, and execute the validation process for all of the files at once. If any of the files fail the validation process, a list of those files will be shown to the user.
Views
There are two tree views, which reside on a split-pane: “Horizontal Split” and “Vertical Split.” By default, the view is set to “Horizontal Split” with the width of the left view minimized. To change the view type, select an option under “View.” To move the boundary separating the two panes, drag the dotted bar appropriately.
In addition, there is a synchronization view which will synchronize navigation through nodes of the tree. This can be enabled/disable by selecting “View,” then “Synchronize.” When navigation is synchronized, a user can add, remove or edit elements in Editor Tree view and immediately see changes on Viewer. When navigation is not synchronized, a user can search a document for certain element/attribute values in one view, maintaining at the same time current position on another view.
Modes
There are 2 tree view modes: “XML Editor” and “XML Viewer.” The Editor mode exposes a hybrid of XML document and schema, whereas a tree view in the Viewer mode exposes a real structure of the XML document.
XML Tree
The XML structure corresponding to the schema is shown as a tree structure in the tree view.
Expand/Collapse Tree
If the XML node is a parent, it will have an “expansion-bar” – a narrow vertical button, which is located along its left border. By clicking on the expansion-bar, corresponding node’s children will be visible or hidden.
Insert/Remove Node in a List
To insert a new node or remove an existing node in a list, first select the list node. A list node appears with a white background in the tree view. Select one of the insert buttons (  ,
,  ) to the left of the tree view or right-click and select an insert option from the pop-up menu to insert a new node in a list. A selected node within a list can be removed by selecting the "Remove node" button (
  ). The editor doesn't allow removing the last node from the list.
Enable/Disable optional node
The checkboxes next to each node indicate whether the node will be included in the XML document. If the schema specifies that the node is optional, the checkbox will be enabled for selection. If the label of a node is grayed out (i.e., disabled), it will not be included in the resulting XML document.
Editing the Schema
In certain instances, such as when a new condition (type of class that assess metrics for conditions for tasks) is created in GIFT, you will want to edit the xsd file in order to allow an XML file to use that newly created element. There are dozens of xsd editors available to help with this effort.
After the xsd is finished being edited, build GIFT to generate the java classes (GIFT\generated\) and the jaxb jar used by GIFT.
Once the jar has been created/updated, the generated java class(es) associated with the changes made in the schema will be available for use in GIFT source development.