Install Instructions - Windows 7
Detailed Instructions
1. Acquire GIFT
A GIFT release includes:
- GIFT Source - contains top level folders such as Domain, GIFT and Training.Apps
- GIFT Third Parties – includes Windows 32bit libraries (needed to build and run GIFT) and applications (some of which are integrated with GIFT).
- Note: 32bit libraries will work on 64bit machines. Furthermore you can configure Java compilation to use 32bit Java for both Windows and the Eclipse IDE.
- Public courses – domain related content such as training application scenarios (e.g., VBS scenario files, PowerPoint files), and GIFT course files.
2. Run the GIFT Installer
The GIFT installer named “installGIFT.bat” is located at the root of the GIFT release (i.e. next to the GIFT, Domain and Training.Apps folder). It has the ability to:
- Check for a built/compiled GIFT software
- Check for and extract the Derby Database data
- Copy the Launch GIFT script to the root of the GIFT release.
Now that you know what the GIFT installer does, go ahead and execute it by double clicking on the “installGIFT.bat” file at the root of the GIFT release. Follow the prompts presented to you to install GIFT.
3. Training Application(s)
As of now GIFT has been tested using the following training application(s). Of course because GIFT has been designed to be a generic framework it can support other training applications. For more information about configuring to use different Training applications refer to GIFT Configuration Settings document.
- VBS
There are a set of demo scenarios created for testing use in GIFT courses. If don’t plan on using VBS as your training application, then you can skip this subsection.
GIFT currently supports VBS2 v1.4 and VBS3.
Visit the GIFT forums to ask how to obtain VBS.
1. Verify VBS is installed on your machine and that you have a shortcut called “VBS LVC Admin (Windowed)” in your Start Menu. Run that shortcut and observe the VBS application starts once to ensure VBS is properly installed.
Note: you will only use this shortcut to confirm that VBS was properly installed. When running with GIFT, there is a special shortcut already provided with the GIFT download.
2. As of GIFT-2015-1, you should no longer need to create a Window’s system environment variable. However, certain security restrictions may prevent the installer from creating a variable called “VBS_HOME” that has the location of the installation directory of VBS.
How to manually verify if there is already a VBS_HOME Window’s environment variable (Windows 7 procedures)
i. Open the Start Menu and right click on Computer. Select Properties.
ii. Select Advanced system settings.
iii. In the Advanced tab, select Environment Variables.
iv. Look for “VBS_HOME” in either the User or System variables sections. If you find it check the value and make sure the value is the VBS installation directory:
Example: C:\Program Files\Bohemia Interactive\VBS
If the value is wrong, either correct the path and continue to step 3 “Install New VBS Terrain” below –or- delete the environment variable and continue reading.
If the variable doesn’t exist, continue reading.
Otherwise you can go on to step 3 “Install New VBS Terrain” below.
Instructions on creating the “VBS_HOME” environment variable:
Option 1: After installing VBS, run the GIFT installer again. This time follow the instructions regarding VBS. Upon the installer successfully completing, the environment variable will be created for you.
Option 2: Manually create the environment variable:
How to create a Window’s system variable (Windows 7 procedures)
i. Open the Start Menu and right click on Computer. Select Properties.
ii. Select Advanced system settings.
iii. In the Advanced tab, select Environment Variables.
iv. Select New under User variables.
v. The variable name is VBS_HOME and the value is the VBS installation directory
Example: C:\Program Files\Bohemia Interactive\VBS
vi. Select OK. You should now see the new Environmental Variable that you created.
3. Install New VBS Terrain
In some instances (e.g. the GIFT VBS Clear Building course), the VBS scenarios used in a GIFT course require a new terrain not provided in the VBS out-of-the-box installation. Therefore you have to place the terrain file(s) in the appropriate VBS directory in order for VBS to find the files during execution.
VBS Terrain files go in <vbs install path>\VBS\mycontent\addons\ (e.g. “jtc_shakarat.pbo”)
If you have any additional VBS terrains used by VBS scenarios referenced by a GIFT course, now is a good time to copy those terrain files into the appropriate VBS directory.
Note: The GIFT “Presence Patrol (Sara)” named course (folder name “VBS.PresencePatrol.Scenario”) uses a terrain provided by VBS, therefore you don’t need to copy any terrain file for the corresponding VBS scenario.
4. Install New VBS Models
In some instances (e.g. the GIFT VBS Clear Building course), the VBS scenarios used in a GIFT course require a new 3D models (e.g. buildings, vehicles, people, animals) not provided in the VBS out-of-the-box installation. Therefore you have to place the model file(s) in the appropriate VBS directory in order for VBS to find the files during execution.
VBS model (e.g. actors, vehicles, buildings, scripts, etc.) file go in <vbs install path>\VBS\mycontent\addons\
If you have any additional VBS models used by VBS scenarios referenced by a GIFT course, now is a good time to copy those model files into the appropriate VBS directory.
Note: The GIFT “Presence Patrol (Sara)” named course (folder name “VBS.PresencePatrol.Scenario”) requires no additional model files, therefore you don’t need to copy any model files for the corresponding VBS scenario.
5. Adding the GIFT scenarios to VBS
A GIFT course folder (located in the Domain folder of GIFT) that utilizes VBS as a training application might have had a VBS scenario created for it to use. In this case the VBS scenario files are located in a folder alongside the GIFT course, dkf, etc. files. This folder needs to be copied to the location where VBS can find it.
The VBS scenarios GIFT has been integrated with can be found in “Domain\<course name>\<vbs scenario folder>\.” The way you can tell if you found a VBS scenario folder is if there are files such as mission.biedi, mission.sqfand mission.sqm.sqf.
Copy and paste each VBS scenario folder you would like to use to “<VBS install path>\VBS\mpmissions\”.
Manual Installation Option:
If security restrictions or other items have complicated the automatic installation of VBS, or VBS extensions, using the installGIFT.bat script, it can be manually installed using the following steps.
1. If VBS is still running, please close it using the appropriate Cancel and Exit buttons offered on the VBS menu system.
2. Double click “installVBSExtensions.bat” in the “GIFT\scripts\install” directory. If the script asks you confirm if a directory should be created or if a file should be overwritten, accept. If no errors are produced, VBS is successfully configured to run GIFT.
Open the directory where VBS was installed. You should observe there is a file called “GIFTVBSGame.bat.” This is the file that should be executed to start VBS when being used with GIFT. It is advised that you create a shortcut to that file on your Desktop.
Do not use any other VBS shortcuts to launch VBS when using GIFT.
- Microsoft PowerPoint
PowerPoint is used by several GIFT Domains to present and monitor PowerPoint shows and is one of the easier training applications to create lessons for. Refer to the appropriate section below based on your desired configuration:- To use PowerPoint:
- Install PowerPoint (at least PowerPoint 2003) on the machine executing GIFT (more specifically the Gateway module).
- Select the GIFT domain folder as a trusted location in PowerPoint as described in the GIFT Configuration Settings.
- The “GIFT/config/gateway/interopConfig.xml” file describes the interface connection named “Powerpoint Adapter” between GIFT and PowerPoint. It uses the type library value to find a specific file in your PowerPoint installation. In some instances the default type library file name maybe incorrect and will be corrected by the Gateway module when it is started for the first time (for more information about interopConfig.xml and configuring PowerPoint, refer to GIFT Configuration Settings).
- To use PowerPoint:
To NOT use PowerPoint
If you do not wish to use PowerPoint all together or you don’t have the Microsoft PowerPoint application, then refer to the appropriate section below to make the PowerPoint interface unavailable for use in this installation of GIFT:
To automatically mark the interface as unavailable because you don’t have PowerPoint, simply continue with the GIFT installation and the first time the Gateway module is started a prompt will appear asking if you would like to make the change.
To manually mark the interface as unavailable:
1. Open “GIFT/config/gateway/interopConfig.xml”
2. Find the interface named “PowerPoint Adapter”.
3. Change the value of “available” from “true” to “false”.
4. Save and then close the XML file.
- TC3 (aka vMedic)
If you would like to use the GIFT Domains that execute TC3 scenarios, then you will need to obtain the GIFT compatible version of TC3. The GIFT version of TC3 can be downloaded here: https://gifttutoring.org/projects/gift/files.
4. Sensor(s)
One of the modules in the GIFT architecture is the Sensor module that communicates with sensors that are software and/or hardware driven. For sensors that are hardware based, you will need to acquire that hardware and any appropriate licenses before being able to use that sensor with GIFT. In addition, you will need to set the sensor configuration file property appropriately to configure the sensor module. Read the GIFT Configuration Settings document for sensor configuration information. Basically you need to specify the sensors you want to use in a sensor configuration file and reference that file in the sensor module properties file. (If you will be following the Test Procedures soon, this step can be skipped as it will be done then.)
If you don’t have sensor hardware to use with GIFT continue to the next section or the next sensor in this list...- Self-Assessment
The self-assessment sensor is a very simple sensor that has no additional hardware requirements. You can configure the sensor module to use this sensor by setting the sensor configuration file property for the sensor module.- Read the GIFT Configuration Settings document for sensor configuration information. Basically you need to specify the sensors you want to use in a sensor configuration file and reference that file in the sensor module properties file.
- Temperature/Humidity Mouse
The mouse reference here is a custom sensor device created for the Army Research Laboratory. It contains a temperature/humidity sensor embedded within the case of an oversized mouse. If you don’t have this piece of hardware as part of your GIFT system, then skip the following section.
- Connect both USB cords of the mouse to the computer. Let Windows automatically install the drivers for the mouse functionality of the device.
- Install the Arduino drivers for the Temperature/Humidity Sensors
- Open up the system’s Device Manager by opening the “Start Menu” and right clicking “Computer” and selecting “Properties.”
- In the new window that appears, select “Device Manager” in the top-left corner of the window.
- In the new window that appears, look for “Other devices” in the tree and then “Arduino Uno” within, right click “Arduino Uno” and select “Update Driver Software.”
- In the window that appears, select “Browse my computer for driver software” and then select “Browse” and in the new window, browse to the GIFT checkout directory and then into “GIFT,” then “External.” Press “OK” and then “Next.”
- A popup may open and warn you about installing this driver, install anyway.
- Q Sensor
The Affectiva Q Sensor is a piece of hardware that measures, among other things, Electrodermal Activity. If you don’t have this piece of hardware as part of your GIFT system, then skip the following section.- Follow the instructions that came with your Q Sensor to install any necessary drivers. Also use the Q Live software to confirm that your system is receiving data from the sensor. Make sure to close Q Live before using the Q Sensor with GIFT as the port may become blocked and unreadable via GIFT Sensor Module logic.
- Read the GIFT Configuration Settings document for sensor configuration information. Basically you need to specify the sensors you want to use in a sensor configuration file and reference that file the sensor module properties file.
- Finally, when you are at the point of launching the Sensor Module pay special attention to any prompts on the command terminal asking you to synch the sensor.
- Emotiv
In order to use the Emotiv (www.emotiv.com) EPOC neuroheadset and software, you must purchase the appropriate license. RDECOM purchased the neuroheadsets and Research edition licenses in order to read “Affectiv” and EEG level data. Due to licensing restrictions, we are unable to release the edk.dll and edk_utils.dll, but note that they come with the purchase of the physical device.
Assuming you have the edk dlls, follow the steps below to use Emotiv:
1. Create “emotiv” directory in GIFT/external/.
2. Place “edk.dll” and “edk_utils.dll” into “GIFT/external/emotiv/”
3. Build GIFT (Note: if the sensor module doesn’t build, try a clean build instead)
The build system is already configured to add the DLLs to the library path.
4. Make sure your Sensor Configuration is correct before launching the Sensor module.
i. You can either author a new sensor configuration file using the Sensor Configuration Authoring Tool (SCAT) or use the existing GIFT/config/sensor/SensorConfiguration.Emotiv.xml file. Either way in order to use the Emotiv headset you will need to make sure the sensor configuration uses the “EmotivSensor” sensor implantation.- Note: the default SensorConfiguration.Emotiv.xml is setup to use the Emo Composer application to produce Emotiv data and not the headset. You will need to uncomment one section and comment the other like shown in Figure 1 and 2 below.
ii. Change the “SensorConfigurationFile” property in GIFT/config/sensor/sensor.properties to the sensor configuration file you want to use. Don’t forget to save the file.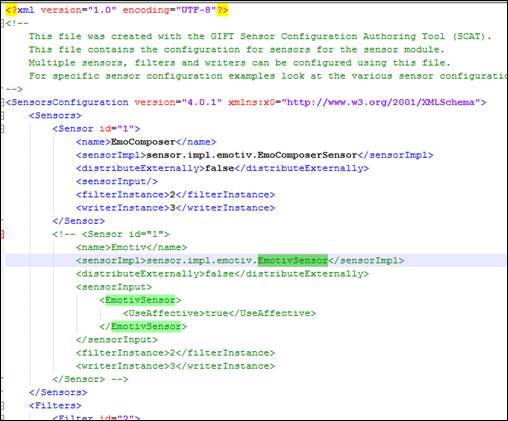
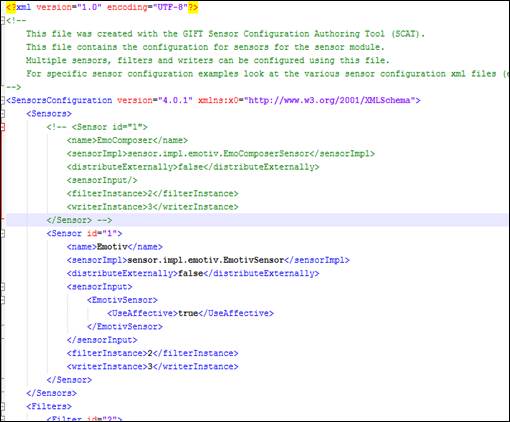
Figure 1. Screenshot showing a portion of the SensorConfiguration.Emotiv.xml that comes with GIFT.
Figure 2. Screenshot showing a portion of the SensorConfiguration.Emotiv.xml, altered so that the Emotiv headset is used because the sensor implementation is "Emotiv Sensor"
Notice how the Emotiv "Emo Composer" is the default sensor implementation.
- Launch Sensor Module using an Emotiv configured sensor configuration file. If there are no errors and the module starts successfully then that’s a good start. Note: you may have to start ActiveMQ before the sensor module.
- Start all GIFT modules and enter into a domain session, then verify, using the monitor or looking at the sensor module output, that sensor data is being captured.
- The Sensor Configuration Authoring Tool (SCAT) can be used to check for library loading issues by loading an emotiv sensor configuration file and GIFT validating its content.
- Multisense
In order to use Multisense, you must first obtain it as part of the Virtual Human Toolkit. The instructions to get Virtual Human Toolkit can be found here: https://vhtoolkit.ict.usc.edu/download/
When installing Virtual Human Toolkit, follow these instructions to ensure that it will work with GIFT:
- Run the Virtual Human Toolkit installer
- Click "Next" on the first screen
- Click "I Agree" on the following screen
- Click "Next" on the following screen (Default destination folder should be C:\vhtoolkit)
- Click “Install”
- Virtual Human Toolkit will be installed with all of its Third Parties
- Uncheck the "Run Virtual Human Toolkit Launcher" checkbox and click "Finish”
- Bioharness
Bioharness 3 is a multi-function sensor produced by Zephyr Technologies (http://www.zephyr-technology.com/). GIFT has been integrated with the Bioharness 3 http://www.zephyranywhere.com/products/bioharness-3/.
This chest-worn sensor communicates with your workstation wirelessly via Bluetooth and is capable of sensing heart rate, breathing wave form, ECG waveform and posture.
To install the sensor follow the instructions provided with your Bioharness 3 unit. Before attempting to run the Bioharness with GIFT, verify the software and drivers have been properly installed. This can be done by running the “BioharnessBlueTooth Test Application V2” provided on the software CD that accompanies the unit. If the software runs successfully, then it everything needed by GIFT should also be installed.
Before running a GIFT session with the Bioharness make sure to do the following:
- Charge the Bioharness unit using the provided USB charger
- Ensure that the Bioharness processor in locked into position on the chest strap.
- Attach the Bioharness strap snugly around the user’s chest.
- Ensure that the workstation where GIFT is installed has Bluetooth capability. (in most cases this will mean to ensure that the Bluetooth USB dongle is in plugged in)
- Power on the Bioharness
- Other Sensors
Depending on the GIFT release, there may be other sensors supported. Refer to the test procedures available in GIFT/docs/testing for more information on configuring and testing other sensors.
5. GIFT Source
The GIFT release has already been compiled for you. If you want to edit the GIFT source then proceed, otherwise continue to the next section.
WARNING: If the path to the GIFT installation folder is too long when building GIFT, an error message will be shown indicating how many characters need to be removed from the path before proceeding.
To build GIFT, Go into the ”GIFT” directory and double click ”build.bat,” when the command prompt disappears, GIFT has finished building.6. Verify that GIFT is running
Verify that GIFT is properly installed by following the instructions for starting the Tutor in the GIFT Run Instructions document.
7. Avatar – “Embedded pedagogical agent” (EPA)
It is highly recommended that you install the Media Semantics Character server in order to present an embedded pedagogical agent (EPA) in the Web based Tutor User Interface (Web TUI) (example shown below) that can, among other things, convert feedback text into speech. To install please follow the instructions in GIFT Media Semantics Character Server Instructions. It is recommended that you have GIFT working before you proceed.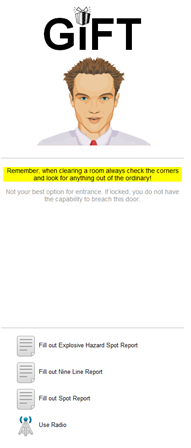
Optional
- Enable Webcam Monitoring
If you have one or more webcams that you would like to view using the GIFT monitor application, follow these steps:
1. Install Yawcam (‘GIFT/external/yawcam_install.exe’) on the machine with the webcam.
2. Open the Yawcam application on the machine with the webcam.
3. Confirm that your camera is configured with Yawcam.
a. Select “Window,” then “Preview” to view the current image.
b. If there is an error or an image doesn’t appear, try detecting your webcam by selecting “Settings,” then “Detect Webcam…”, followed by selecting your webcam from the list of devices.
4. Select the “Enable” button next to Stream on the Control Panel tab.
a. In addition, select “Settings,” then “Edit Settings…” on the main dialog, then “Startup” and check ”Start Stream output” and “Hide to traybar at start” on the “Yawcam – Settings” dialog that appears.
b. The GIFT monitor will use the default port of 8081 which can be found by selecting “Stream” under “Output” on the “Yawcam – Settings” dialog that appears.
5. Confirm the webcam is streaming by opening a web-browser on the machine with the webcam and visiting the url “http://localhost:8081/”.
6. The Monitor camera configuration file can be found under ‘GIFT\config\tools\monitor\cameras.txt.’ For more information refer to the GIFT Configuration Settings document.
7. Optionally, you can configure the Yawcam application to:
a. Start as a windows service – run (as administrator) the “Yacam-NTservice-Install.bat” and then “Yawcam-NTservice-START.bat” files, found in the Yawcam install folder. Now when Windows is started the Yawcamapplication will automatically be started as well.
- Adobe Acrobat Reader
If you intend to use course materials (e.g. PDF files) that require Adobe Acrobat Reader, download and install the latest version of the software. Adobe Acrobat Reader is available here: http://get.adobe.com/reader/otherversions/. Other browser-embedded PDF readers are acceptable, but are not documented within this document.
- Install WinPython 2.7.5.3
If you intend to use either the QrsFromEcgFilter or XmlRpcService you will need to install python. Currently the only supported python distribution is WinPython 2.7.5.3. This is a heavy-weight distribution that installs all required libraries in a single installation process. Other python distributions may work and GIFT may move to a lighter weight distribution in future releases.
The software can be downloaded and installed from the GIFT Install Tool. Registered users can also download the installation program from the GIFT Portal at https://gifttutoring.org/projects/gift/files
To install the software through the GIFT Install Tool:
1. Run the GIFT installer and navigate to the ‘Miscellaneous’ page
2. Click the button to “download and install WinPython”
3. Log into the GIFT Portal and allow the WinPython installation program to download
4. When the download completes, click “Run”
5. The WinPython setup program will prompt you for an “Install Location”. Choose a destination folder for WinPython and click “Install”. You will need to specify this WinPython folder in the GIFT Install Tool when the installation is complete
6. When the WinPython installation is complete, return to the GIFT Install Tool. Click “Browse” and navigate to the WinPython folder created during the installation
7. Click “Next,” then “Finish” to complete the setup
Alternatively, if WinPython has already been installed:
1. Run the GIFT installer and navigate to the ‘Miscellaneous’ page
2. Click the button indicating WinPython has already been installed
3. Click "Browse" and navigate to your WinPython directory
4. Click “Next,” then “Finish” to complete the setup
When the GIFT Install Tool completes, a Windows User Environment Variable will be set with the variable name “GIFT_WINPYTHON_HOME” and the value will be the path of the WinPython folder, for example “C:\Program Files\WinPython-32bit-2.7.5.1”
GIFT Directory Structure
Domain/ - contains information specific to domains, i.e. VBS Scenarios
GIFT/ - contains the GIFT modules
api-docs/ - created by the build process, contains the Javadocs
bin/ - created by the build process, contains the jar files for each GIFT module
build/ - created by the build process, contains the class files
config/ - contains properties files for each of the GIFT modules and their loggers
data/ - contains the pedagogical models and empty databases for UMS and LMS
docs/ - contains helpful GIFT-related documents such as this one
external/ - contains the external (third-party) dependencies (installers, tools, jar files) needed to run the system
generated/ - created by the build process, this directory gets created during the build and contains jaxb generated java classes. These classes are directly related to GIFT XML schema (.xsd) files.
output/ - where all the log files are stored, i.e. domain session, survey response, module logs
scripts/ - contains the scripts to launch modules and clean up log files
src/ - contains the GIFT source code
src.py/ - is for current and future python source code that is used to augment the core GIFT baseline
test/ - where all the junit tests are located
Training.Apps/ - contains information specific to the training applications, i.e. application plugins
Optional Instructions
Install and Configure SQuirreL SQL Client
The Squirrel application allows you to view and query against the GIFT Derby database.
- Download and install Squirrel SQL Client
- The project site is: http://sourceforge.net/projects/squirrel-sql/. At the time this is being written the latest stable package is http://sourceforge.net/projects/squirrel-sql/files/1-stable/3.5.0/squirrel-sql-3.5.0-install.jar/download locatedhttp://sourceforge.net/projects/squirrel-sql/files/1-stable/3.5.0/.
- Double click on the downloaded jar (e.g. squirrel-sql-3.5.0-install.jar) and an installation dialog will appear.
- Proceed through the installation until you get to the screen where you are supposed to “Select the packs you want to install:”. Make sure to select the following:
- Optional Plugin - Derby
- Optional Plugin – Hibernate
- Finish the installation.
- Launch Squirrel
- You will need the JAVA_HOME Windows environment variable set to an installed JDK on your machine. (we use the JDK provided by GIFT).
- If you selected to have a desktop or start menu icon then execute that, otherwise double click on the “squirrel-sql.bat” file where you installed Squirrel.
- Note: in version 3.5.0 there was a bug in the squirrel-sql.bat file for Windows 7 64x. To fix the problem change the following lines and then save and execute the file again:
- set IZPACK_JAVA="%JAVA_HOME%" to set “IZPACK_JAVA=%JAVA_HOME%"
- set LOCAL_JAVA=%IZPACK_JAVA%\bin\javaw.exe to set "LOCAL_JAVA=%IZPACK_JAVA%\bin\javaw.exe"
Before being able to connect to the GIFT derby database you will need to make sure your Squirrel application has the appropriate Derby Client driver configured.
- Check driver:
- After launching Squirrel, go to the “Drivers” panel and find “Apache Derby Client” in the list of drivers.
- If there is a check mark next to “Apache Derby Client” you can proceed onto “Create a GIFT Derby Alias“ step. Otherwise continue to “Change Driver” step below.
- Change driver:
- After clicking on “Apache Derby Client” in the list of drivers, select the “Modify the selected driver” button right above it (currently the button has a pencil on it).
- Click on the “Extra Class Path” tab.
- Click on the “Add” button.
- Browse to your GIFT installation and then select the derby.jar and derbyclient.jar in the external\derby folder as shown, similarly, in the screenshot below.
- Select the Open button on the file browse folder and then the OK button on the “Add Driver” window.
- There should be a check next to the “Apache Derby Client” in the list of drivers.

- Create a GIFT Derby Alias
- Click the “+” button in the “Aliases” pane in SQuirreL to create a new Alias.
- Create a name for the Alias in the “Name” textfield. (e.g. “UMS Derby Client”)
- Select “Apache Derby Client” as the “Driver”
- Modify the “URL” value to look like the below value but replace the red text with the path to your GIFT folder:
- For UMS database connection:
- jdbc:derby://localhost:1527/C:\GIFT\data\derbyDb\GiftUms;user=root;password=root
- For LMS database connection:
- jdbc:derby://localhost:1527/C:\GIFT\data\derbyDb\GiftLms;user=root;password=root
- In order to connect to the LMS database in Squirrel, it cannot be running in GIFT.
- Shut down the LMS Module in GIFT if it is running.
- Execute startNetworkServer.bat (located at GIFT/external/db-derby-10.10.1.1-bin/bin)
- Test the Alias by selecting the “Test” button followed by the “Connect” button on the dialog that appears. You should see a popup dialog that states “Connection Successful”. Select the OK button on that popup to close it. Finally select the OKbutton on the Alias dialog to save the alias and close the dialog.
More help can be found in <path-to-squirrel-install>/doc/quick_start.html.
- Double click on the Alias you created in the “Aliases” pane on SQuirreL.
- Select the “Connect” button. Upon successful connection the view should change to show information about the database. By default this is the Metadata tab of the database connection.
- To view values in a table:
- Expand your alias named node under the “Objects” tab.
- Expand the “APP” schema node.
- Expand the “TABLE” node.
- Select a table to view.
- Select the “Content” tab to the right of the panel you have been selecting nodes in. The table’s rows are now visible.
Troubleshooting
If the Alias fails to connect and an error message is displayed (could be in the stack trace of the error) such as “Check your URL” – trying using another “derbyclient.jar”. This issue was seen on one GIFT developer’s computer. Merely changing which derbyclient.jar was being used from GIFT/external/derby/derbyclient.jar to GIFT/external/db-derby-10.10.1.1-bin/lib/derbyclient.jar solved the problem.